This amazingly simple and easy Quinoa Flatbread is healthy and sure to be a new family favorite. You just may never buy bread again after tasting these delicious flatbreads. It is versatile and oh so yummy! A fabulous Whole Food Plant Based recipe. Vegan, oil free, sugar free, no processed ingredients.
Hi! Ameera here!
Quinoa flatbread is all the rage. It has been popping up everywhere I look. I told Mom that we really need to check it out especially since we are Whole Food Plant Based and gluten free.
Whole Food Plant Based AND gluten free!
Do you know how hard it is to find a store bought Whole Food Plant Based compliant bread that is also gluten free? It is as elusive as a unicorn. We have searched high and low, near and far, and all over the “innerwebs.”
Every bread we have checked out – if it was oil free and refined sugar free, it had wheat (gluten); if it was gluten free, it had refined sugar or oil. It just doesn’t exist people!
If you find this “unicorn bread,” please let us know!!!
Gluten Free Traditional Bread Baking Challenge
If you have ever tried to bake something Whole Food Plant Based, not an issue, easy enough, right?
Now add the complexity of also making it gluten free; it takes it to a whole “nuther” level. So we have recipe tested a number of WFPB gluten free traditional breads, they are OK, but not amazing – in other words, they don’t rate high enough to make it on our blog. The challenge continues, but then . . .
Quinoa Flatbread
So, when I saw everyone making quinoa flatbread, I was really intrigued. Every social media site I went to, people were mixing 1 cup of quinoa with 1 cup of water, baking it and wahhhlaaaa (presto!), quinoa flatbread – made it, tried it, while it was good, I knew it could be better!
19 pounds of quinoa later
Yes, you read that right, mom and I used 19 pounds of quinoa – testing tons of variations of quinoa flatbread in our quest to create a really great quinoa flatbread recipe.
We baked and baked, and baked some more to arrive at quinoa flatbread heaven. Then once we had that down, we started making awesome variations.
Quinoa Flatbread Heaven
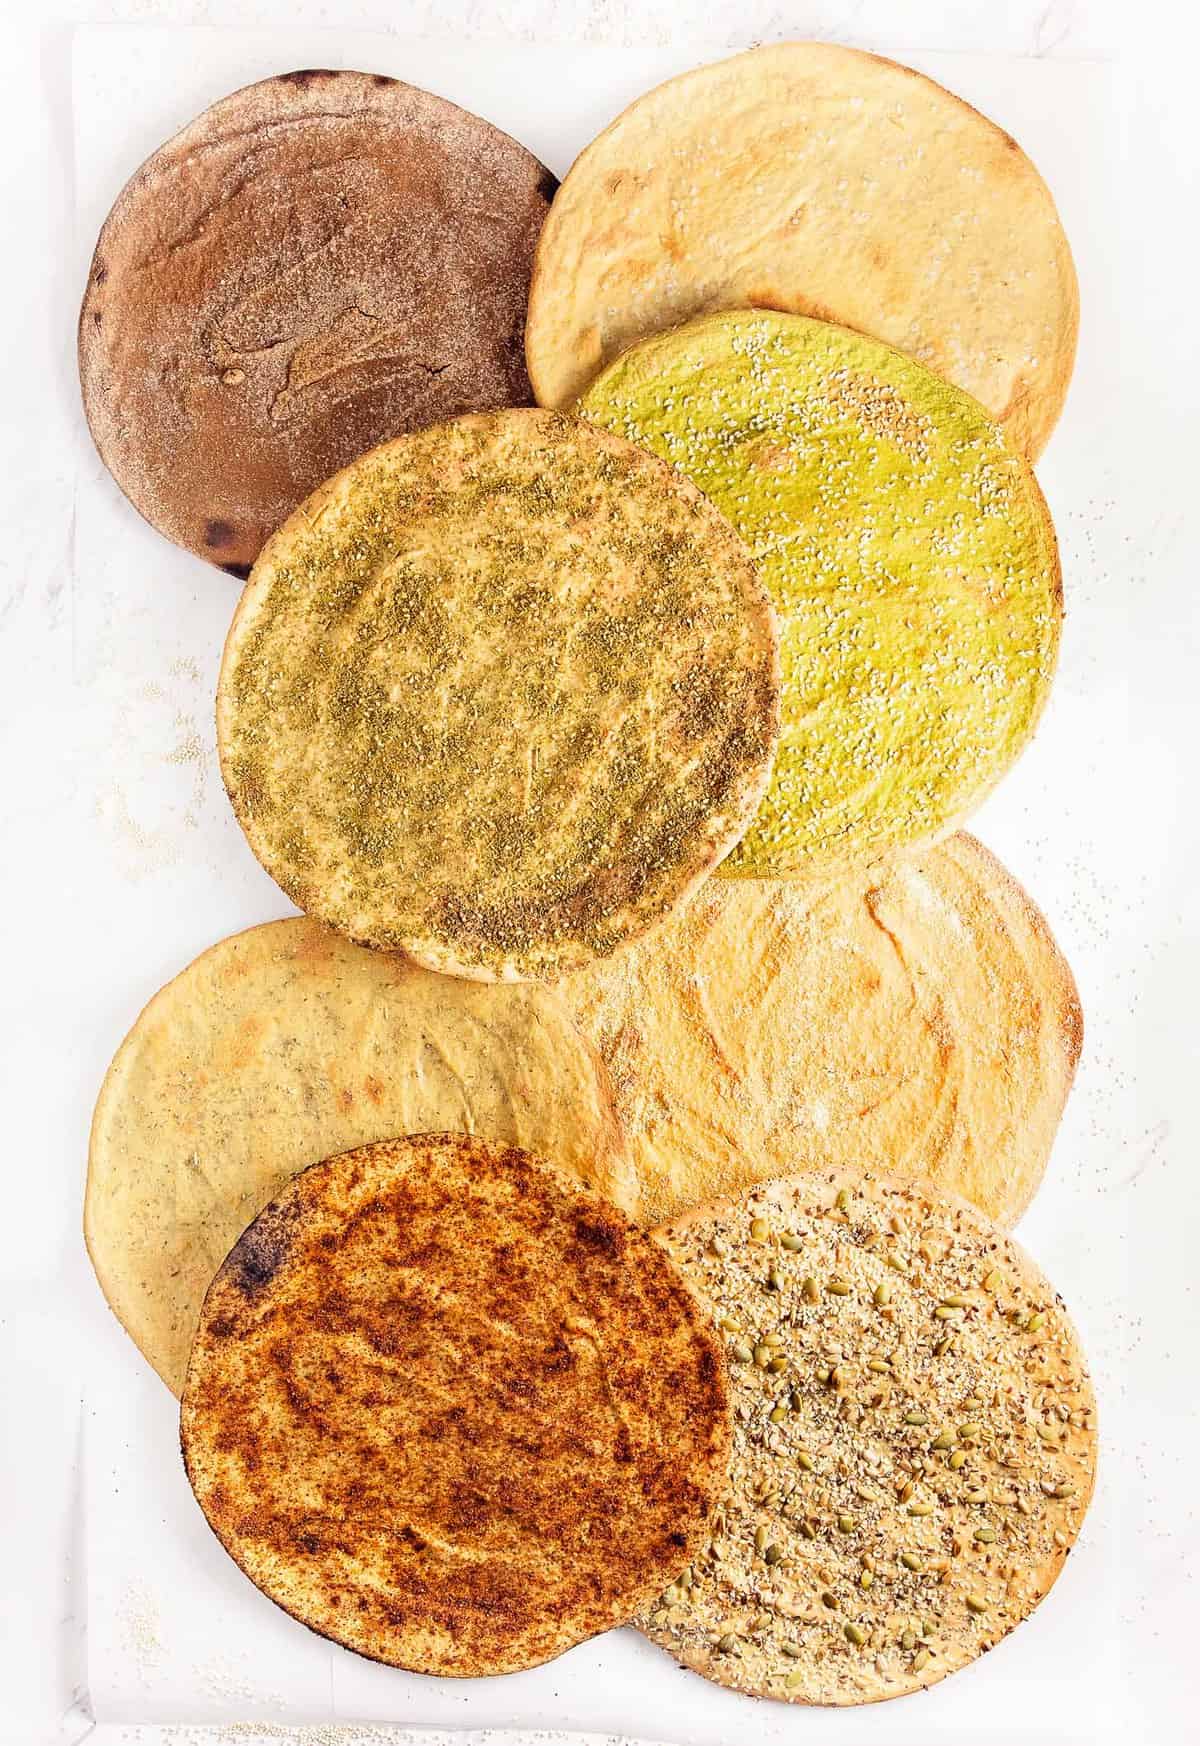
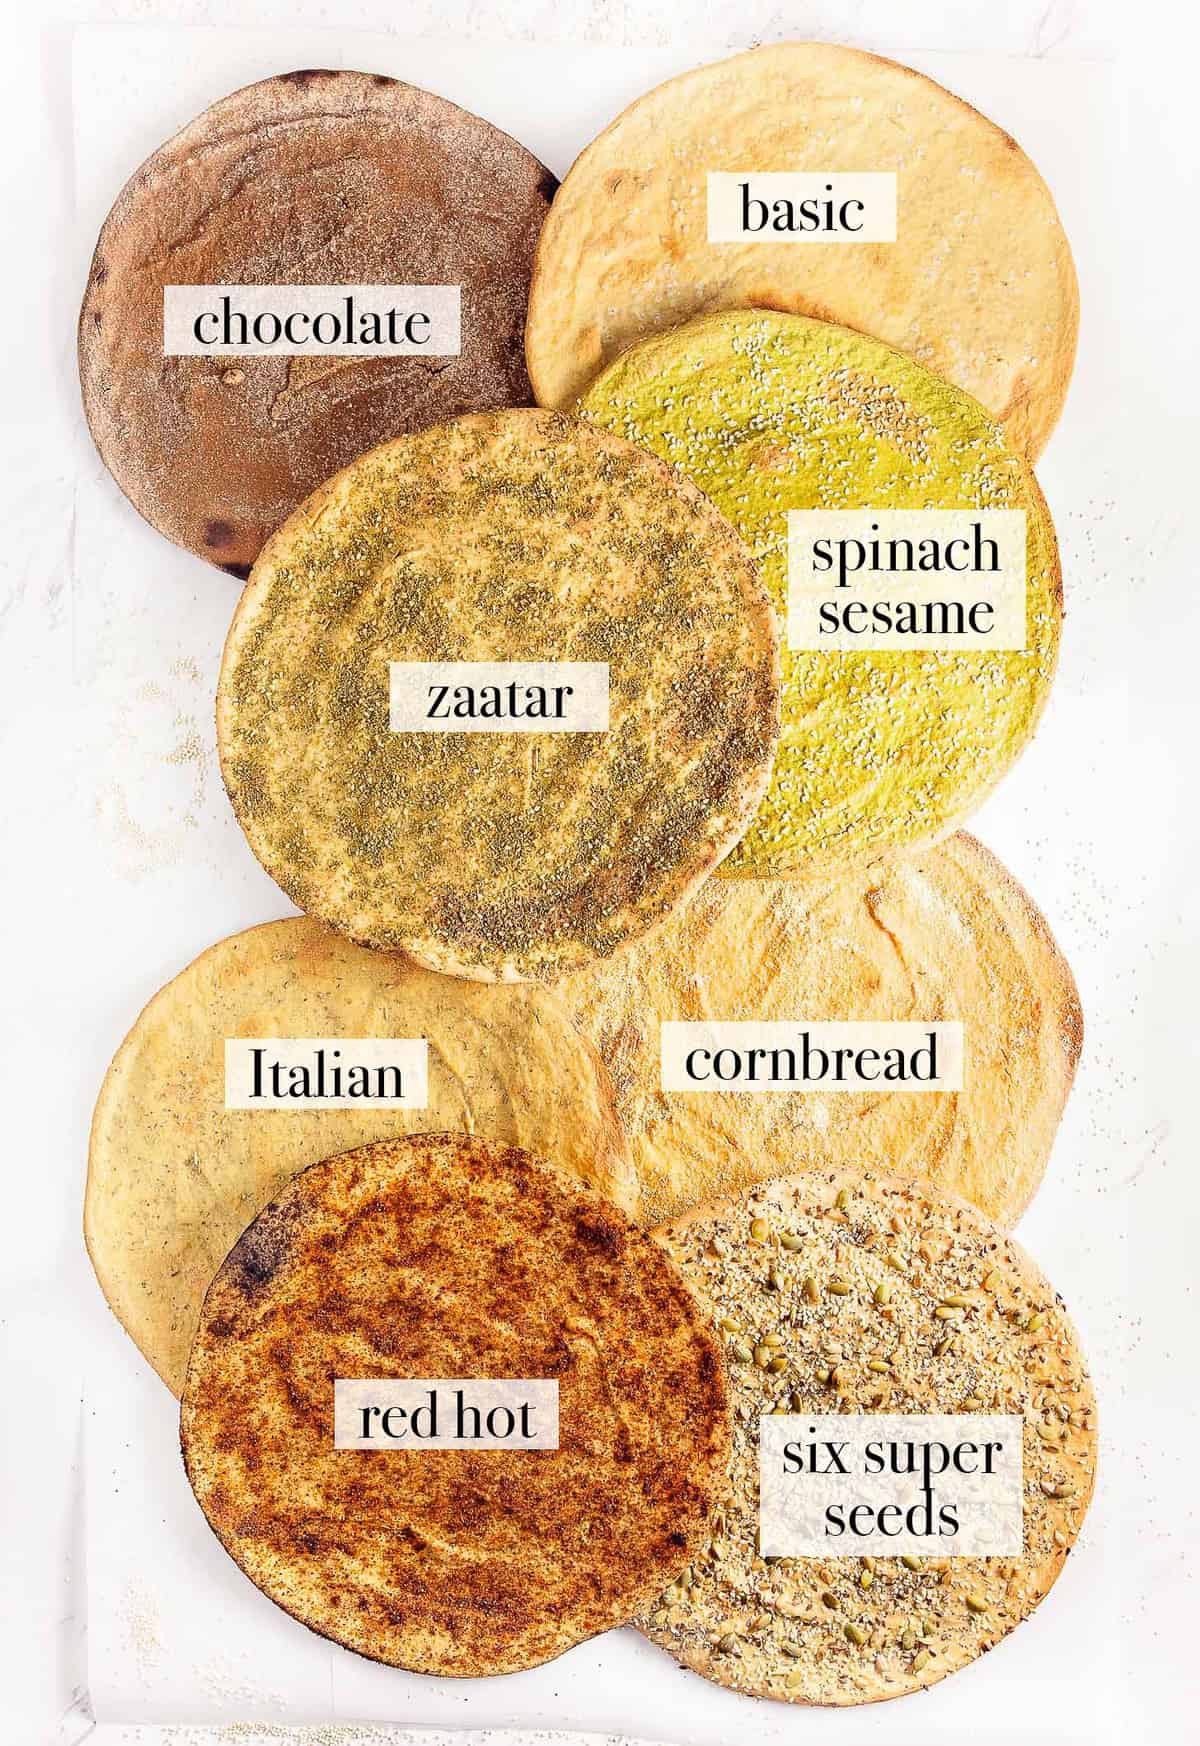
We came up with our Basic Quinoa Flatbread recipe and 7 variations. We actually have about 10 more, but those are a post(s) for another day.
This post contains affiliate links, and I may receive a very small commission if you purchase through those links at no additional cost to you. Thank you for supporting Monkey and Me Kitchen Adventures! For more information, see our disclosures here.
Robin here!
Monkey was all over this quinoa bread thing. She was like “Mom, let’s try this thing!” I will be honest, I am not a huge quinoa fan. Never have been, so I had been stalling on testing a quinoa flatbread.
But once we made our first successful flatbread, I was hooked. I love the flatbreads super crunchy. Monkey prefers it a little more chewy, but I really love the extra crispy version.
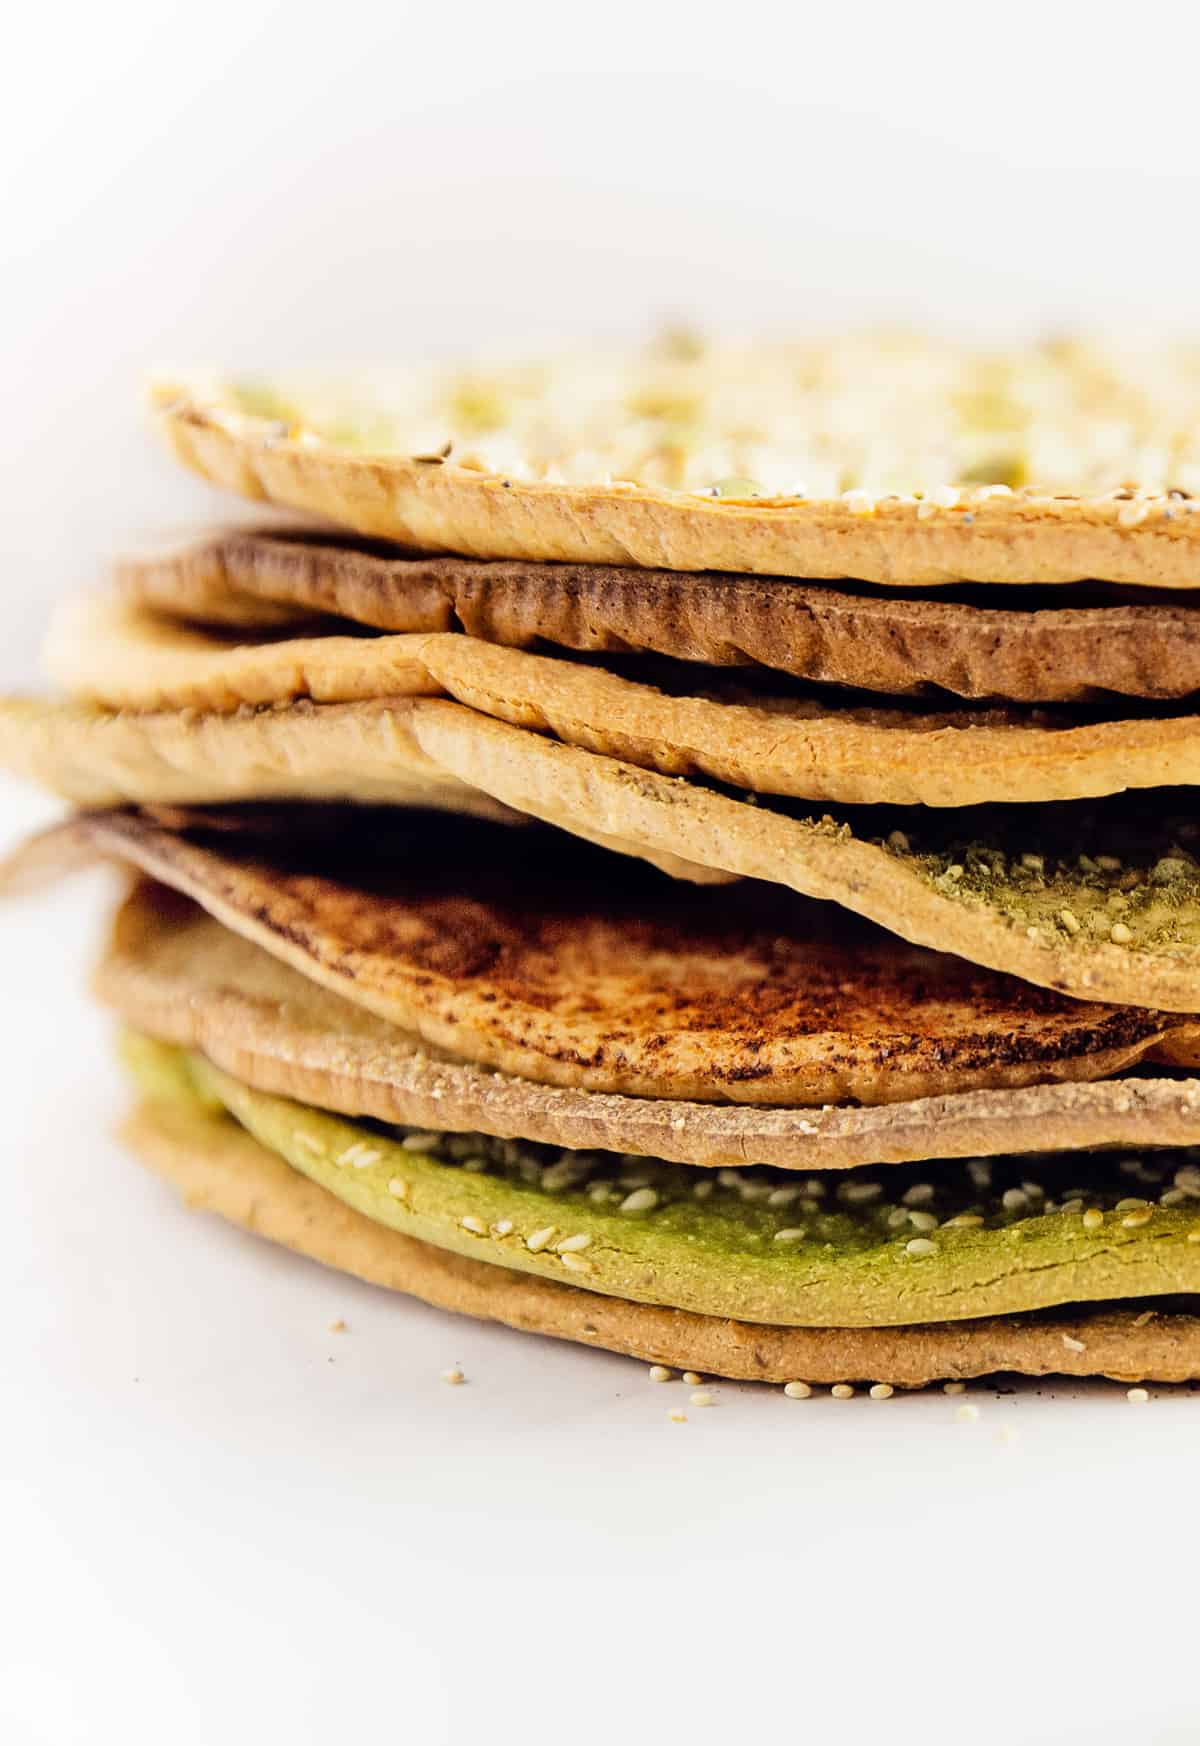
The best part is you can make it more chewy or more crunchy depending on your preference, all you do is change the length the flatbread is in the oven on the second (flip-side) baking time.
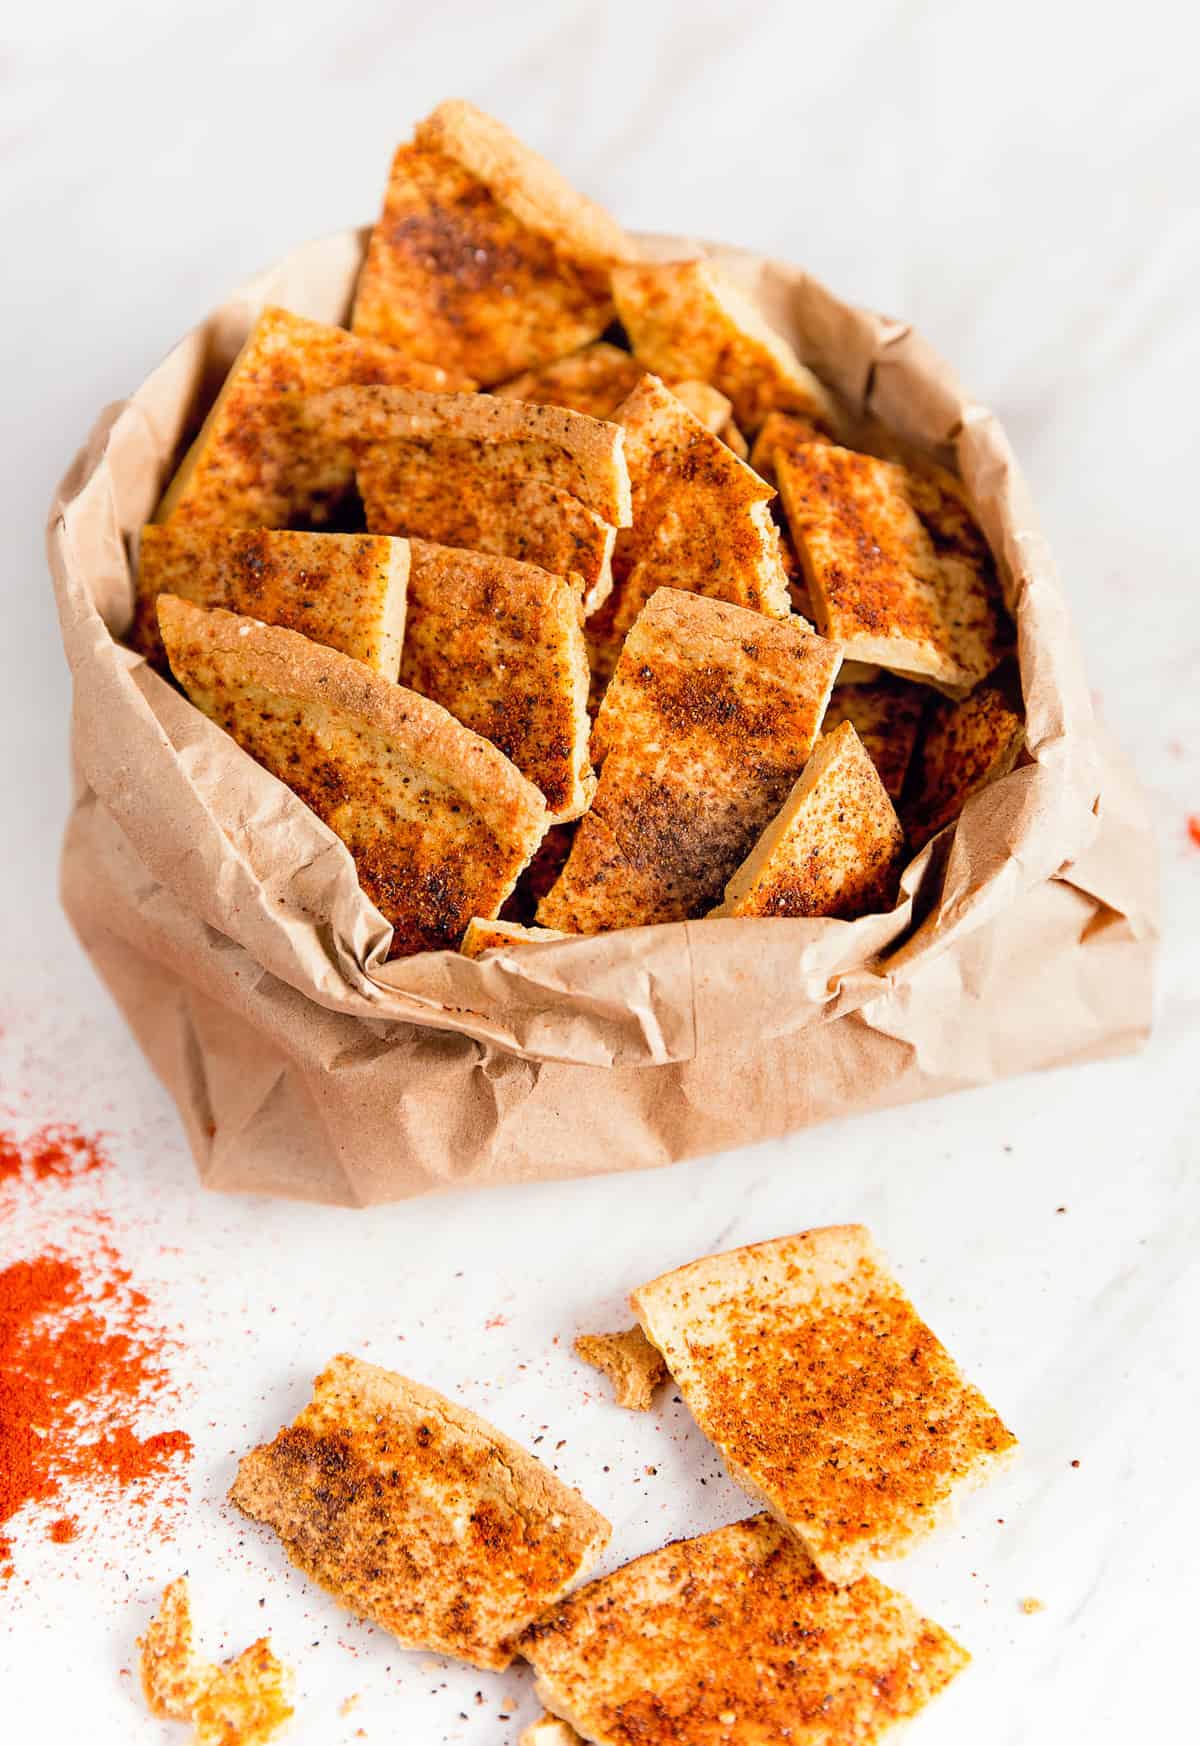
The Red Hot version is my favorite as it reminds me of spicy chips. It is SO crunchy good.
The Next Day
The next day, the quinoa bread tends to get chewy (even if it was initially crispy). No problem, just heat up the oven again and crisp that baby right up! It gets extra crispy. We like to break it up and put it in salads kinda like big flat croutons or fattoush (fattoush = Middle Eastern salad with crispy fried pita bread broken in pieces into the salad).
High Speed Blender
We use a Ninja High Speed Blender with great results. The key is that the quinoa must be broken down into a batter consistency. We used the “Auto IQ Ultra Blend” setting on our Ninja. Our regular food processor was not able to break down the quinoa enough. We honestly believe you need a high-speed blender to make this work. UPDATE: We recently purchased a Vitamix! When using our Vitamix, we found that we needed to use the tamper tool to help move the batter along until it was able to blend on its own. If you don’t help it along, then the batter doesn’t completely mix well and become smooth. The batter should be smooth without any visible quinoa remaining.
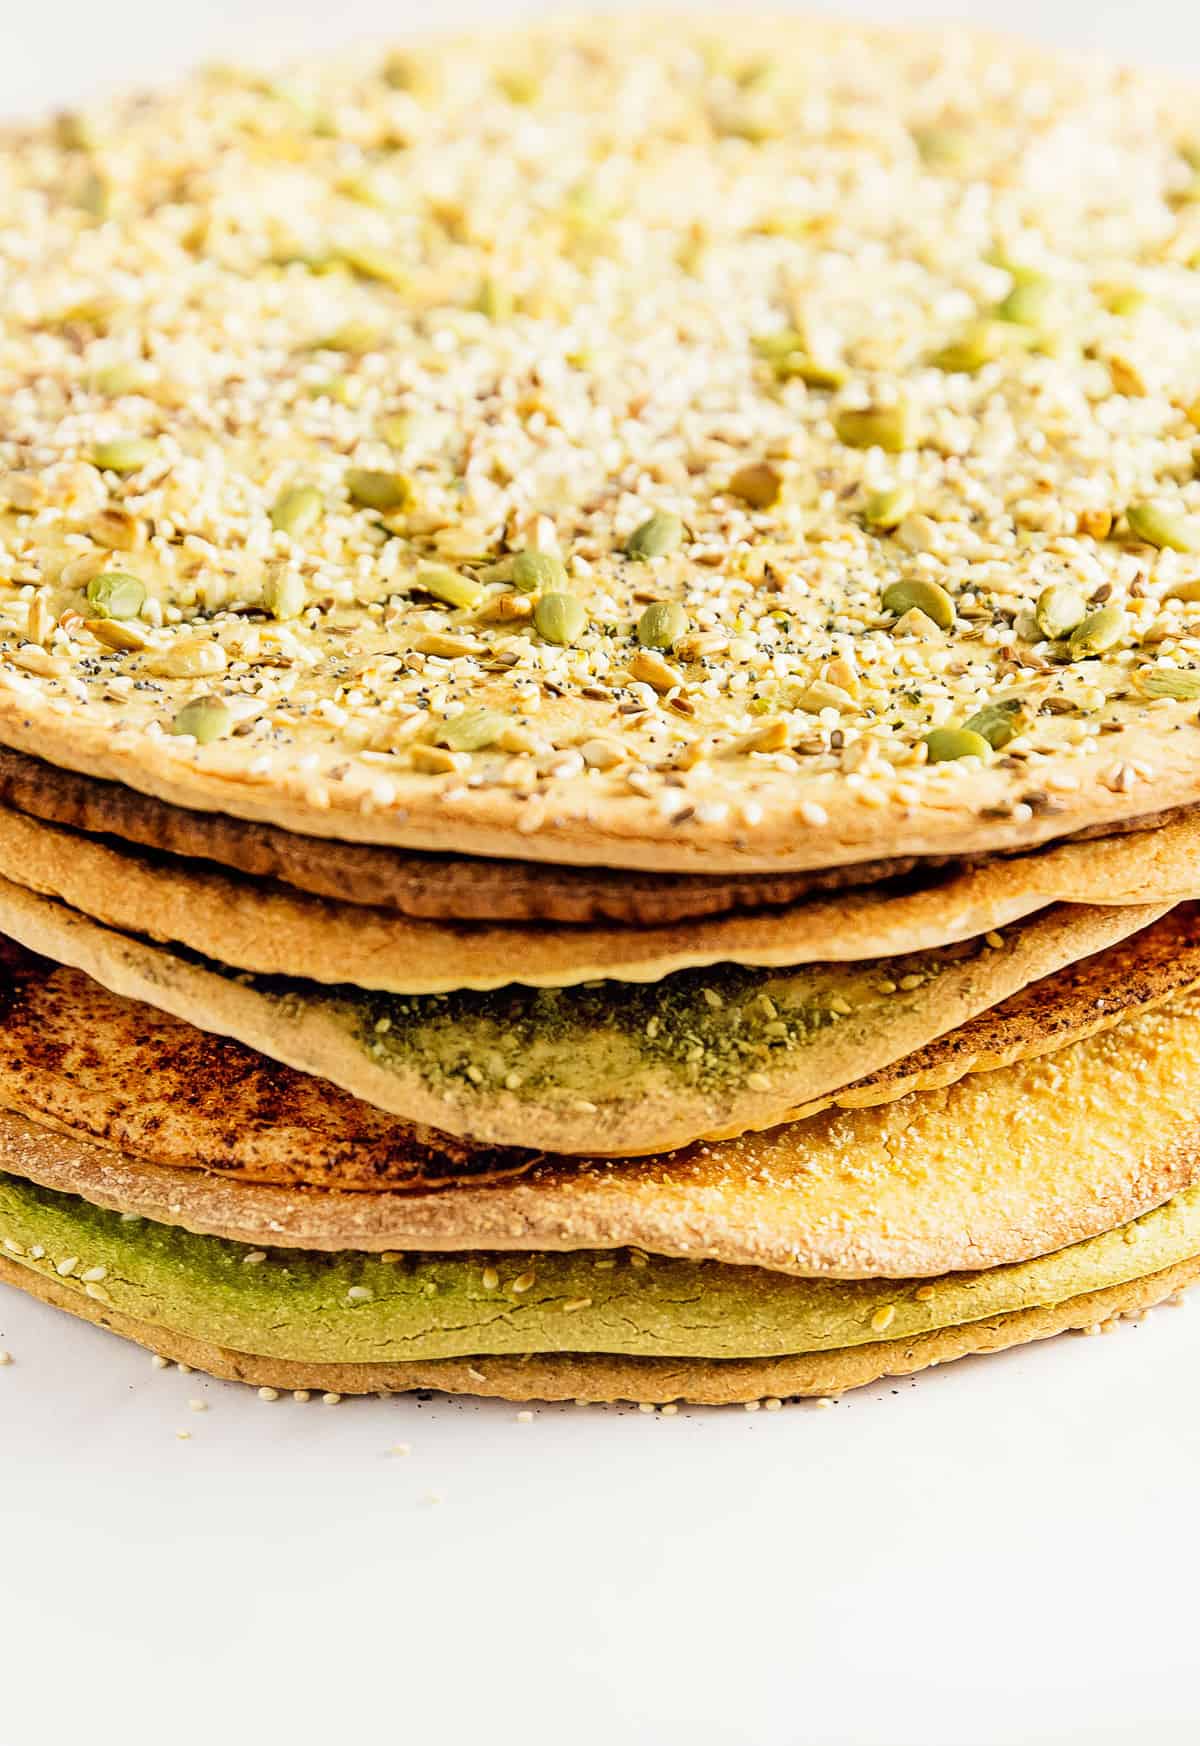
Here’s the basic quinoa flatbread plus 7 more variations:
- Basic Quinoa Flatbread
- Spinach Sesame Quinoa Flatbread
- Chocolate Quinoa Flatbread
- Red Hot Quinoa Flatbread
- Cornbread Quinoa Flatbread
- Zaatar Quinoa Flatbread
- Six Super Seeds Quinoa Flatbread
- Italian Quinoa Flatbread
Each flatbread has it’s own picture, description, and recipe (see below)
Products used:
- High-Speed Blender (We have a Ninja) – See Recipe Notes Update: We now have a Vitamix
- 14 x 20 Baking Sheet
- Large thin edged spatula
- Tongs
- Parchment paper or silicone baking mat
#1: Basic Quinoa Flatbread
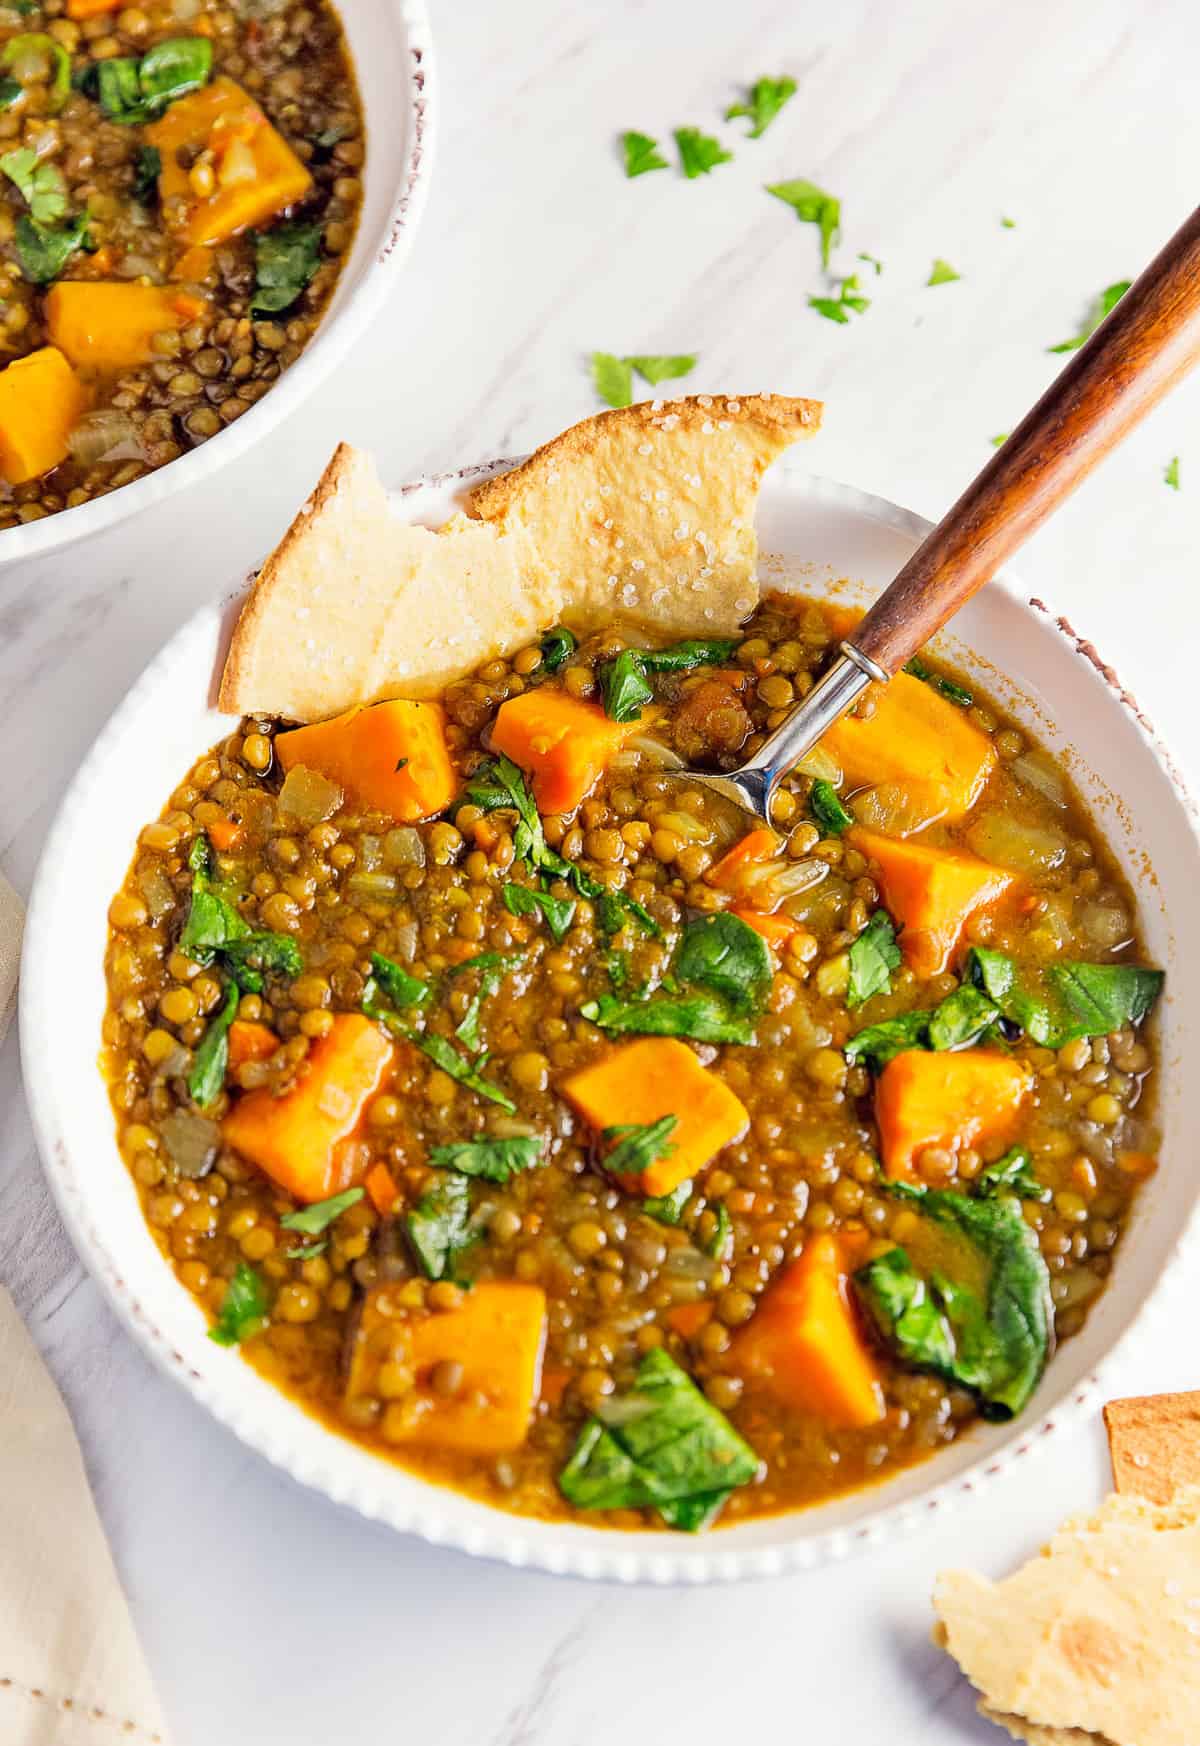
Ameera here! Mom and I did a ton of quinoa flatbread experimentations. We went through 19 pounds of quinoa. Thank goodness, Fresh Thyme had a sale on their bulk quinoa at $4.47 a pound. After testing umpteen million quinoa breads, we finally landed on the perfect ingredients and bake times 🙂 We loved using our Basic Quinoa Flatbread with our Moroccan Sweet Potato Lentil Stew!
Print
Basic Quinoa Flatbread
- Prep Time: 7 minutes
- Cook Time: 21 minutes
- Total Time: 28 minutes
- Yield: 1 Flatbread 1x
Description
This amazingly simple and easy Quinoa Flatbread is healthy and sure to be a new family favorite. You just may never buy bread again after tasting these delicious flatbreads. It is versatile and oh so yummy! A fabulous Whole Food Plant Based recipe. Vegan, oil free, sugar free, no processed ingredients.
Ingredients
- 1 cup quinoa – uncooked
- ½ cup + 1 Tablespoon unsweetened plain plant milk
- 1 teaspoon baking powder
- ¾ teaspoon sea salt
Instructions
- Preheat the oven to 425 degrees F.
- Line a 14 x 20 baking sheet with parchment paper (or use a silicone baking mat). Invert the parchment paper and trace an 11-inch diameter circle in the center of the parchment paper to use as a pouring guide. Flip the parchment paper over and place onto the baking sheet. You should be able to see the circle from the other side. Note: This step is not required, but for some it can be helpful.
- Place the dry quinoa in a fine mesh strainer and rinse the quinoa really well with running water for two minutes. This removes the bitterness from the quinoa. Shake to drain excess moisture.
- Add the rinsed quinoa, plant milk, baking powder, and sea salt into a high-speed blender and blend on high for one minute. When using our Vitamix, we use the tamper tool to help move the batter along until it was able to blend on its own. If you don’t help it along, then the batter doesn’t completely mix well and become smooth. The batter should be smooth without any visible quinoa remaining. With a Vitamix, it may take a little longer to completely blend the quinoa, about 2 minutes. Reference the photos to review the consistency. Additionally, since this is a small amount of batter, use the smaller Vitamix container.
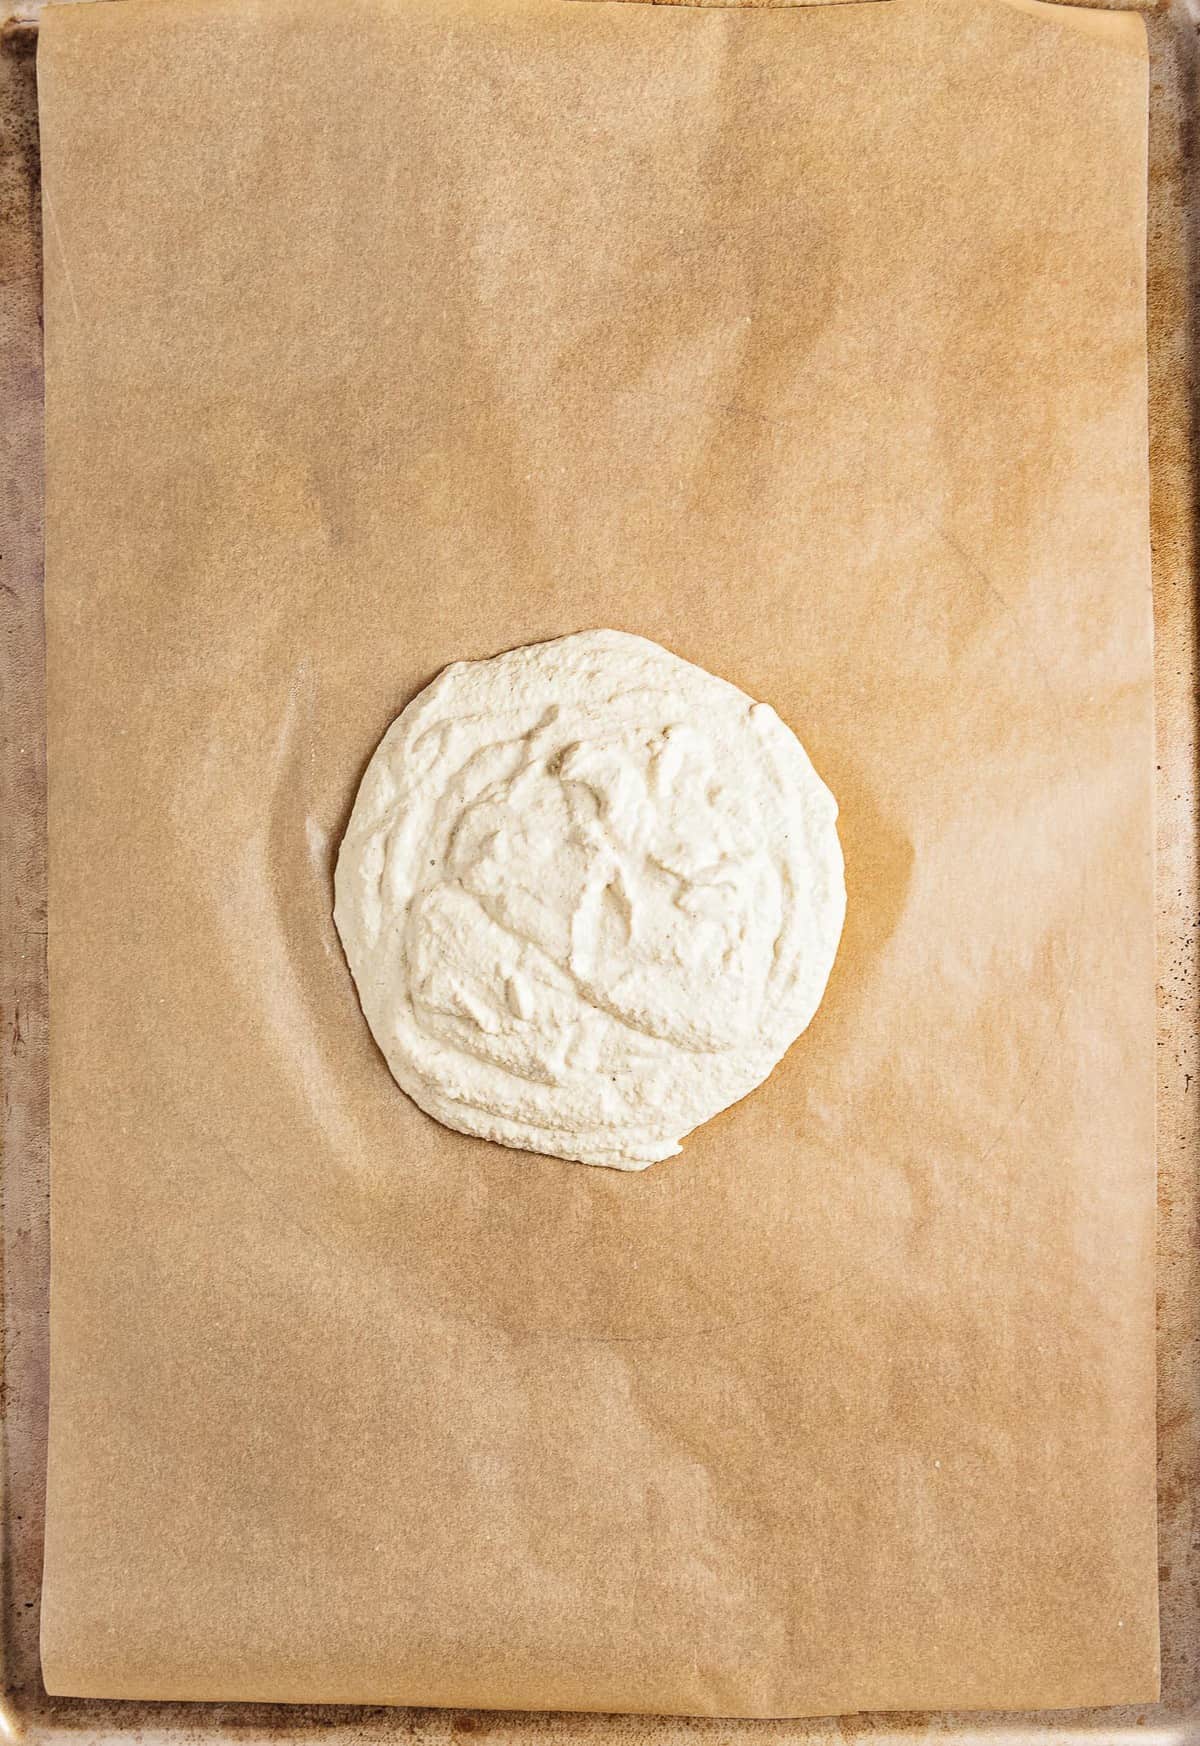
- The batter consistency is key here. Since quinoa has slight variations of “dryness” depending on how old it is, you need to pay attention to the thickness of the batter. The batter should be somewhat thick, but pourable with the help of a rubber spatula to get it onto the parchment lined baking sheet. If the batter appears overly thick, then add a teaspoon (+) of plant milk to loosen it up.
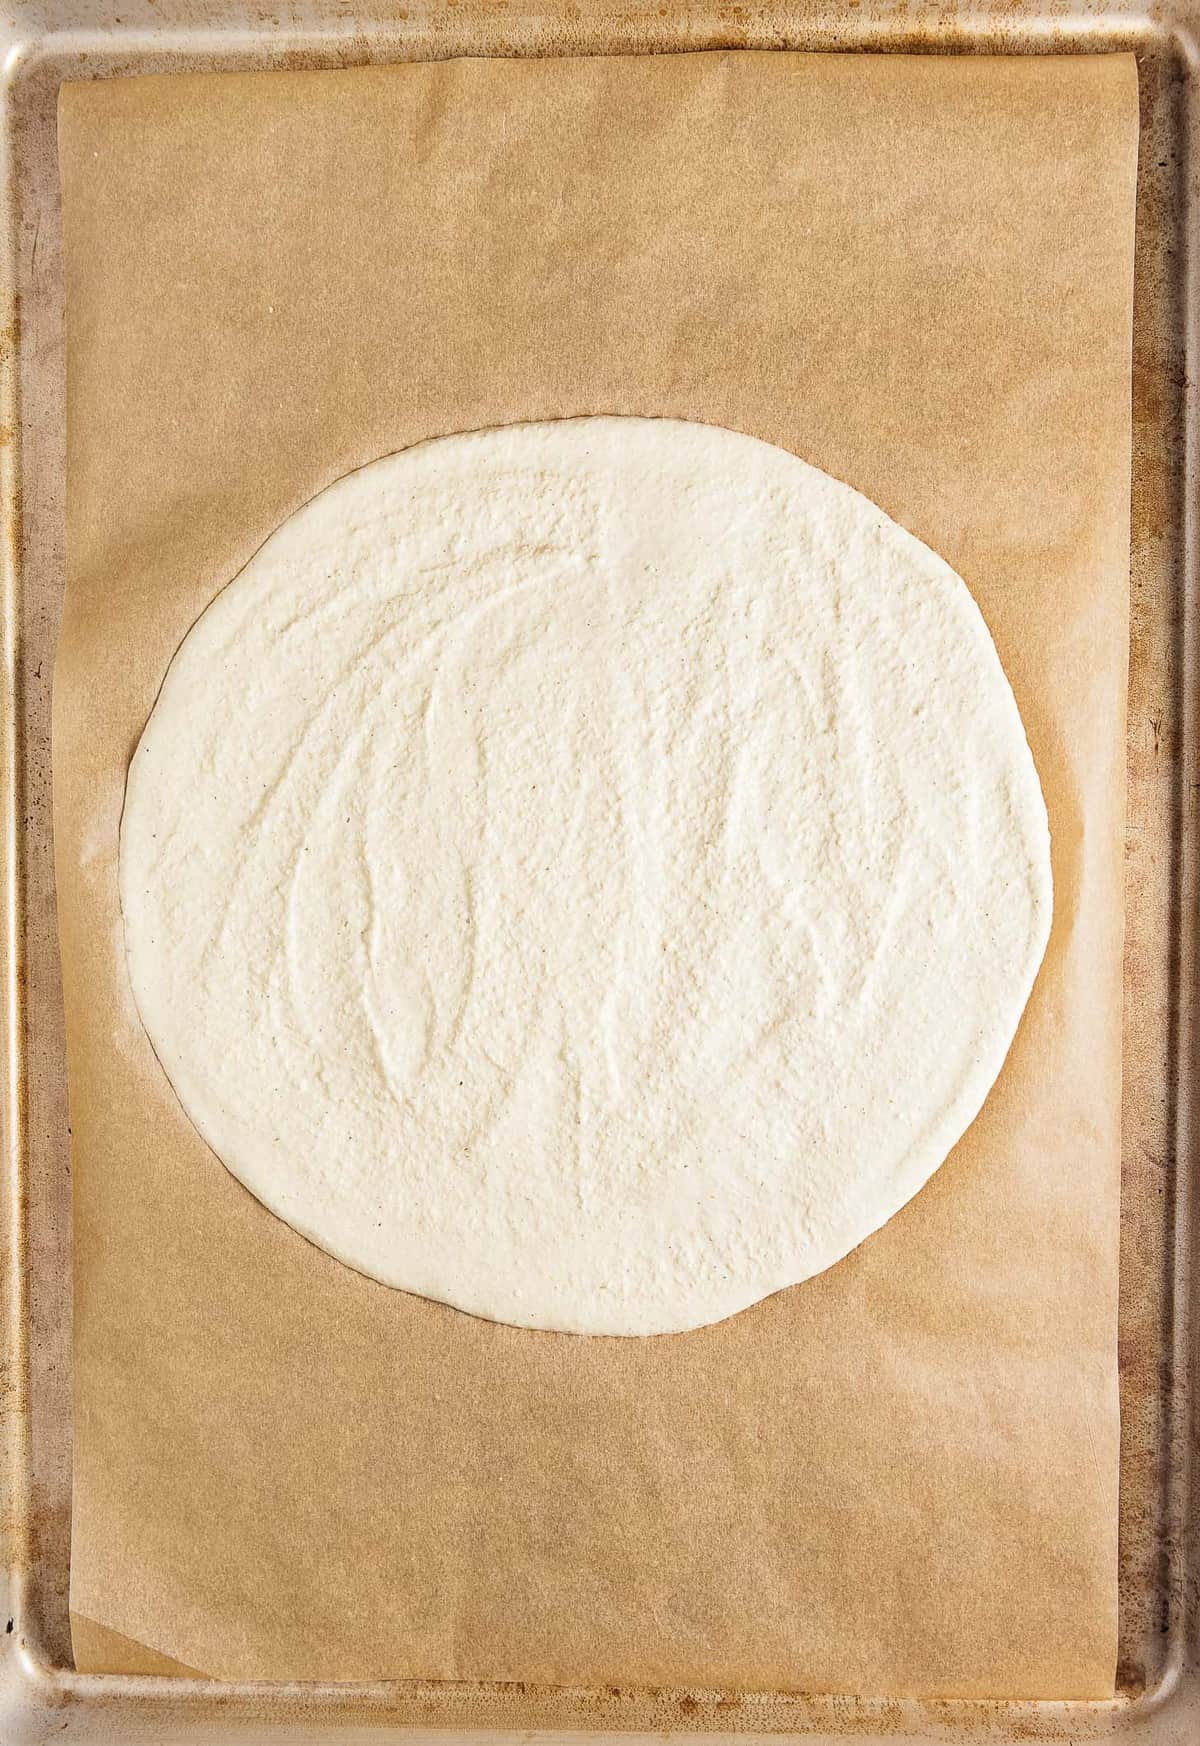
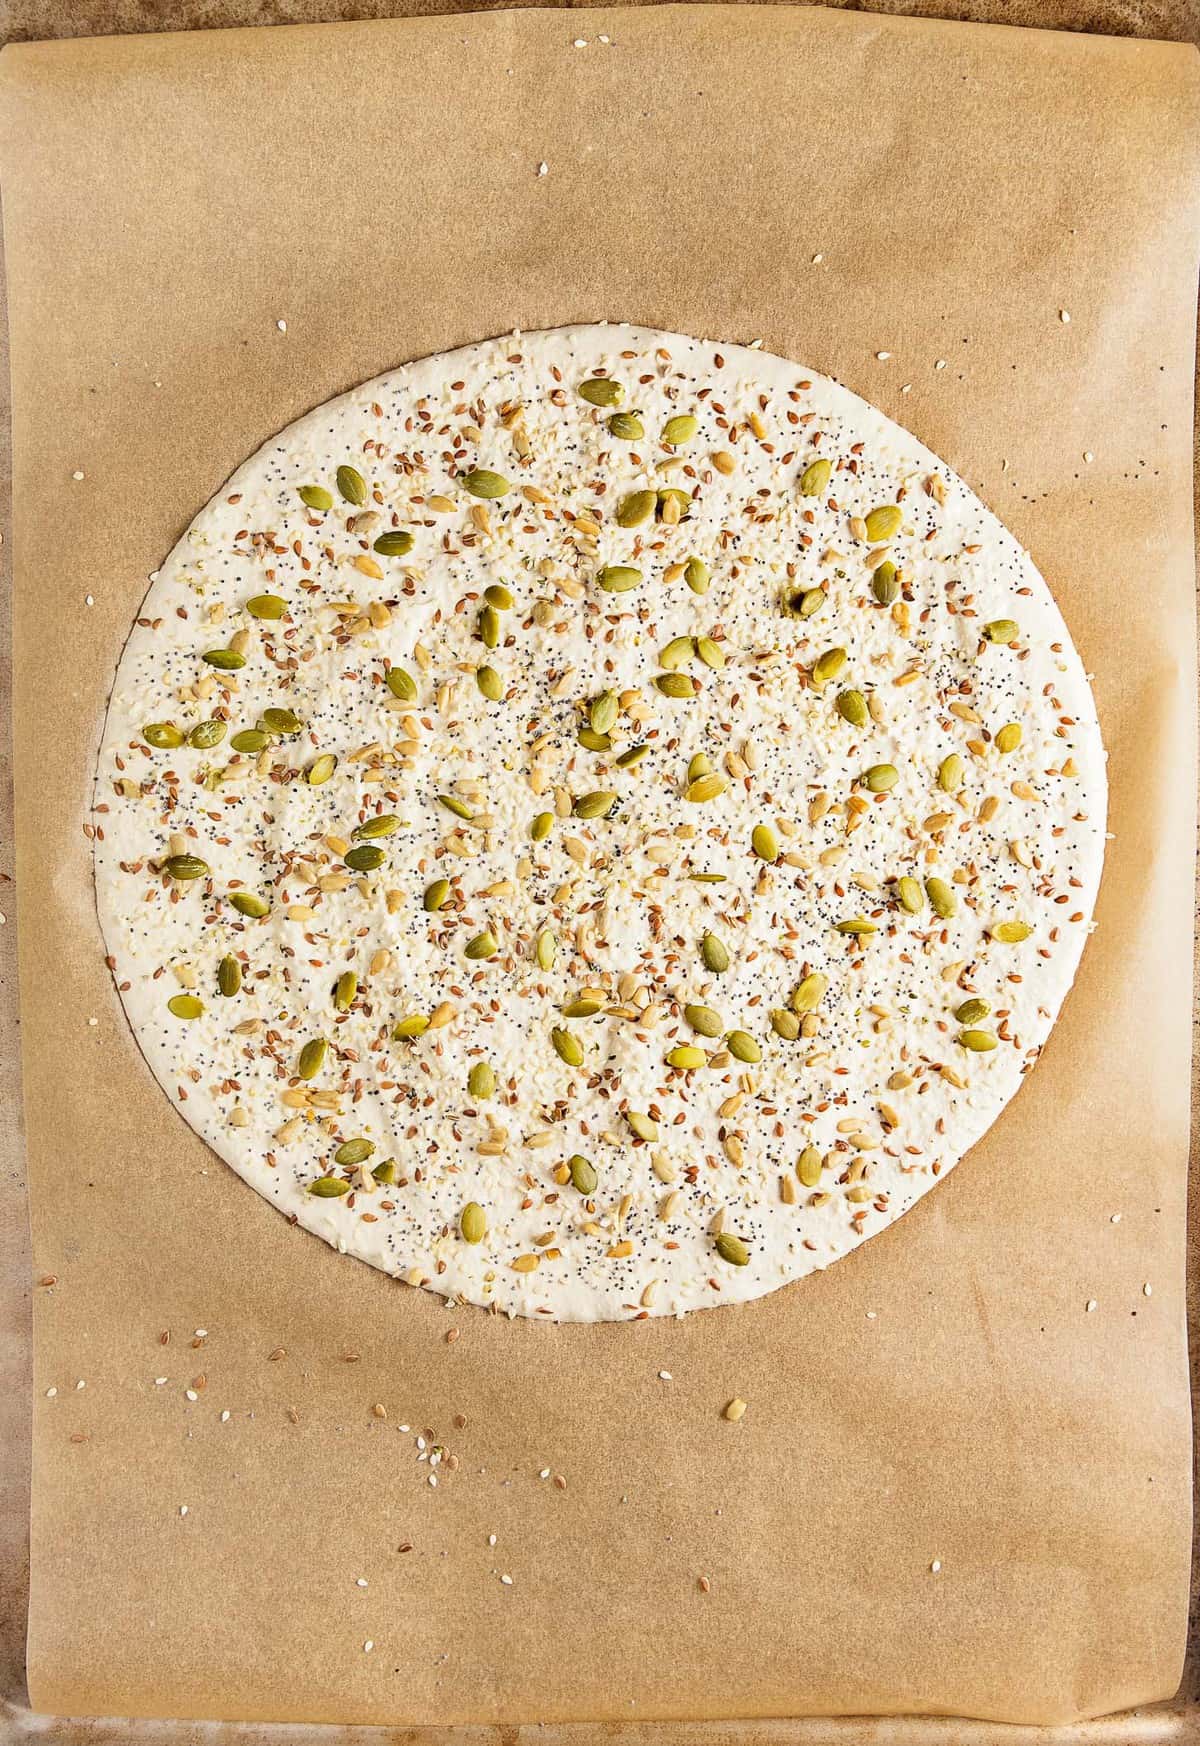
- Drop the batter into the center of the circle that you drew on the parchment paper. Once you get pretty much get ALL the batter out of the high-speed blender, take a rubber spatula and start to spread it out. Working from the center, gently pushing the batter outwards until you reach the outline of the circle. The batter should be spread thin. Reference the photos on the blog post for reference.
- Place the quinoa flatbread into the oven and bake for 15 minutes.
- After 15 minutes, remove the quinoa flatbread from the oven, then using a thin edged spatula, gently loosen the bread from the parchment paper, flip over, and then return to the oven for another 4 to 5 minutes for chewy. Bake 6 to 7 minutes for crispy, 6 minutes for crispy, 7 minutes for crispy and crunchy.
- Enjoy!
- See additional recipe variations.
Notes
UPDATE: Reference Instructions for Our Favorite (not shown): Garlicky Cheese Quinoa Flatbread: Add 2 Tablespoons of nutritional yeast, 1 teaspoon garlic powder, and 1 (to 2) extra teaspoon plant milk to the Basic Recipe. Bake for 15 minutes, flip, bake for 4 minutes.
*Quinoa Flatbread: This is not your typical soft flatbread. It is made from quinoa and is not soft and fluffy because it has no oil which typically gives a more fluffy and soft texture. It is however, very tasty and satisfying.
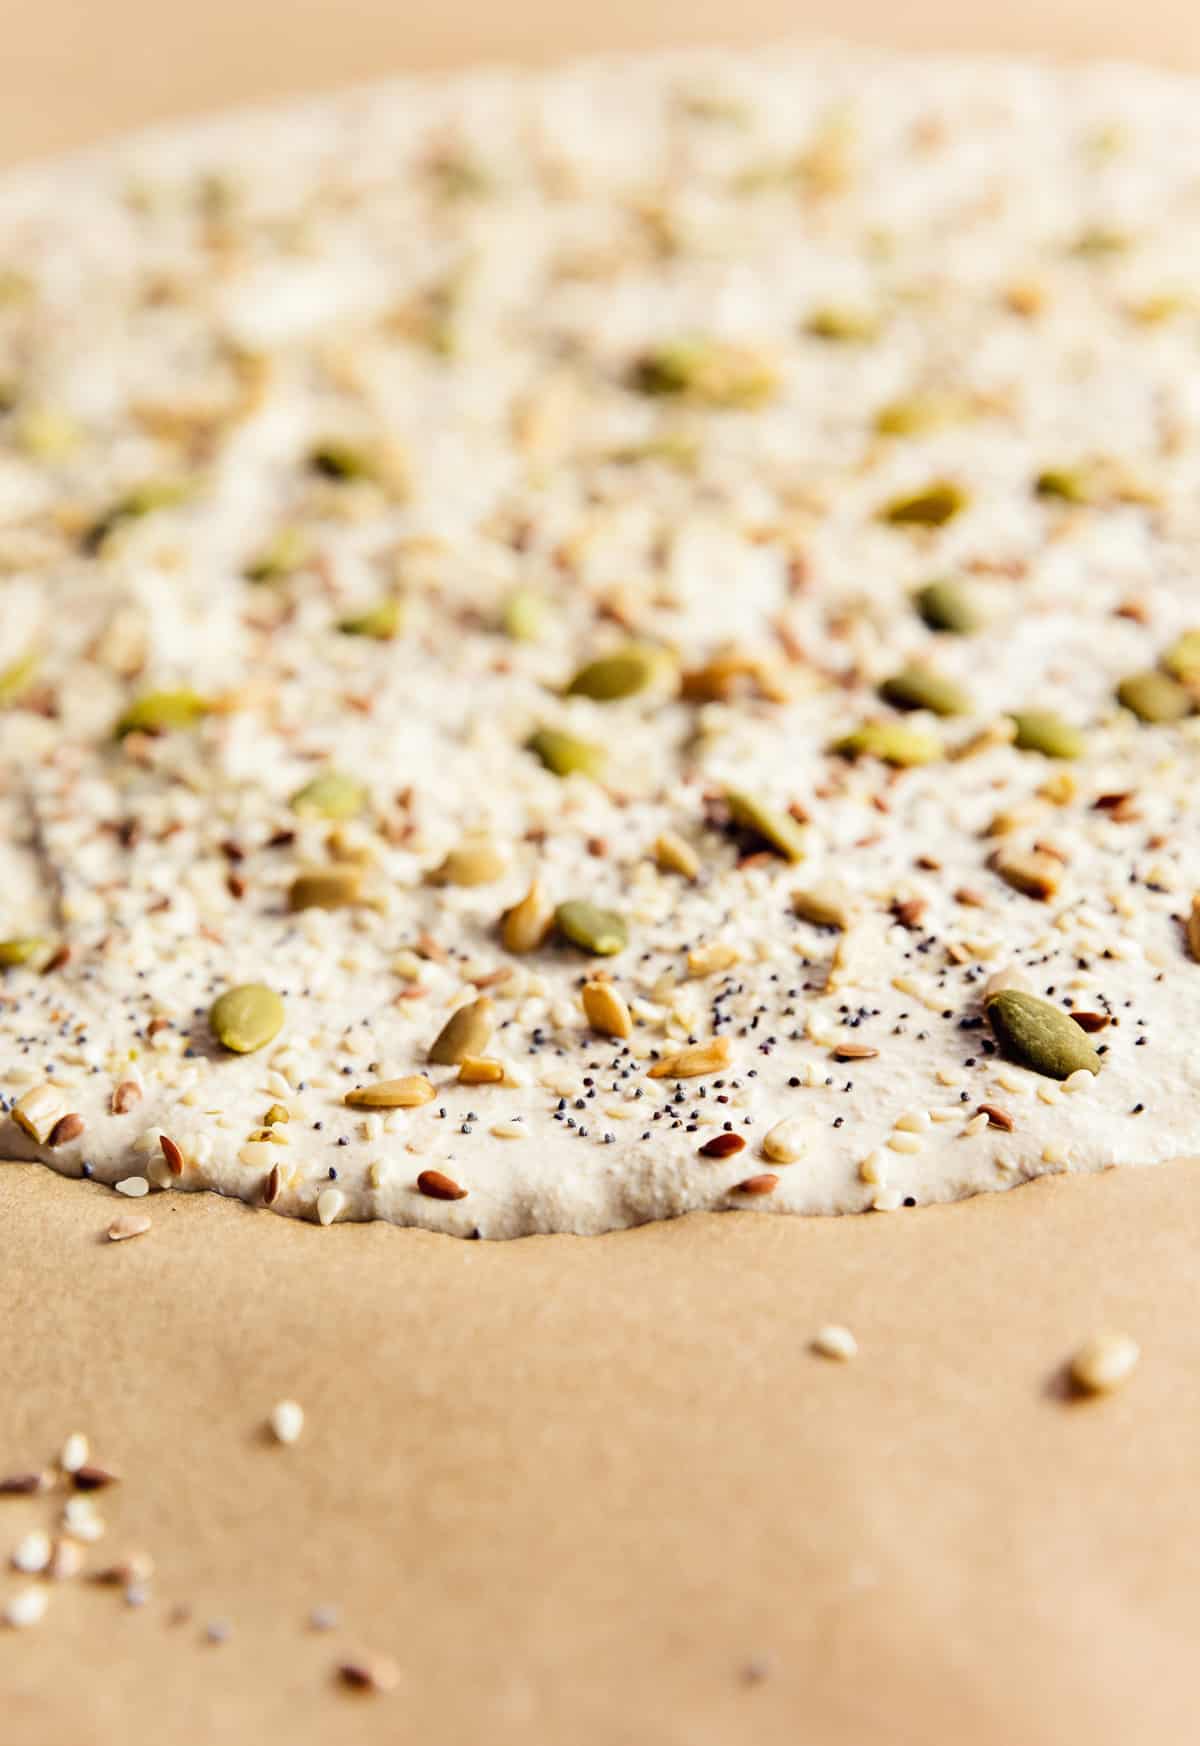
*Batter: The batter consistency is key. The batter should be on the thick side, but should spread easily with a rubber spatula. It should look like a fudgy brownie batter, but very spreadable.
*Batter Thickness or rather thinness: Another key element is to spread the batter thin. The batter will not rise much, but since the batter is consisting of crushed quinoa you want the batter thin so it bakes thoroughly. If it is too thick, then your quinoa bread will be gummy. Reference the numerous photos on the blog post for reference.
*Baking Time: If you like your quinoa bread super crispy, follow the instructions on baking times. It is very important that you set and USE a timer for both the 1st side and flip side of the baking. Otherwise, you could end up with a gummy flatbread.
*Oven Preheat to 425 degrees F: It is very important that your oven is fully preheated before you begin the baking process.
*11-inch circle guide: The 11-inch circle guide works really well because it lets you know just how thin the batter should be when spreading it out. This is not required, but is helpful.
*Flip side baking: After the 1st 15 minutes of baking, remove the baking sheet from the oven, use a long thin edged spatula and gently loosen the quinoa flatbread around all the edges. The baked bread will want to stick to the parchment paper, but trust me it comes loose with just a few tugs, then slide your spatula underneath the center of the flatbread, once it is fully loose, very carefully flip it over using tongs (be careful not to tear the flatbread.) It should flip over easily, then return the flatbread to the oven and do the flip-side baking. Be careful, it’s HOT!
*High Speed Blender: We use a Ninja High Speed Blender with great results. The key is that the quinoa must be broken down into a batter consistency. We used the “Auto IQ Ultra Blend” setting on our Ninja. Our regular food processor did not have the power to break down the quinoa. UPDATE: We recently purchased a Vitamix! When using our Vitamix, we found that we needed to use the tamper tool to help move the batter along until it was able to blend on its own. If you don’t help it along, then the batter doesn’t completely mix well and become smooth. The batter should be smooth without any visible quinoa remaining.
#2: Spinach Sesame Seeds Quinoa Flatbread
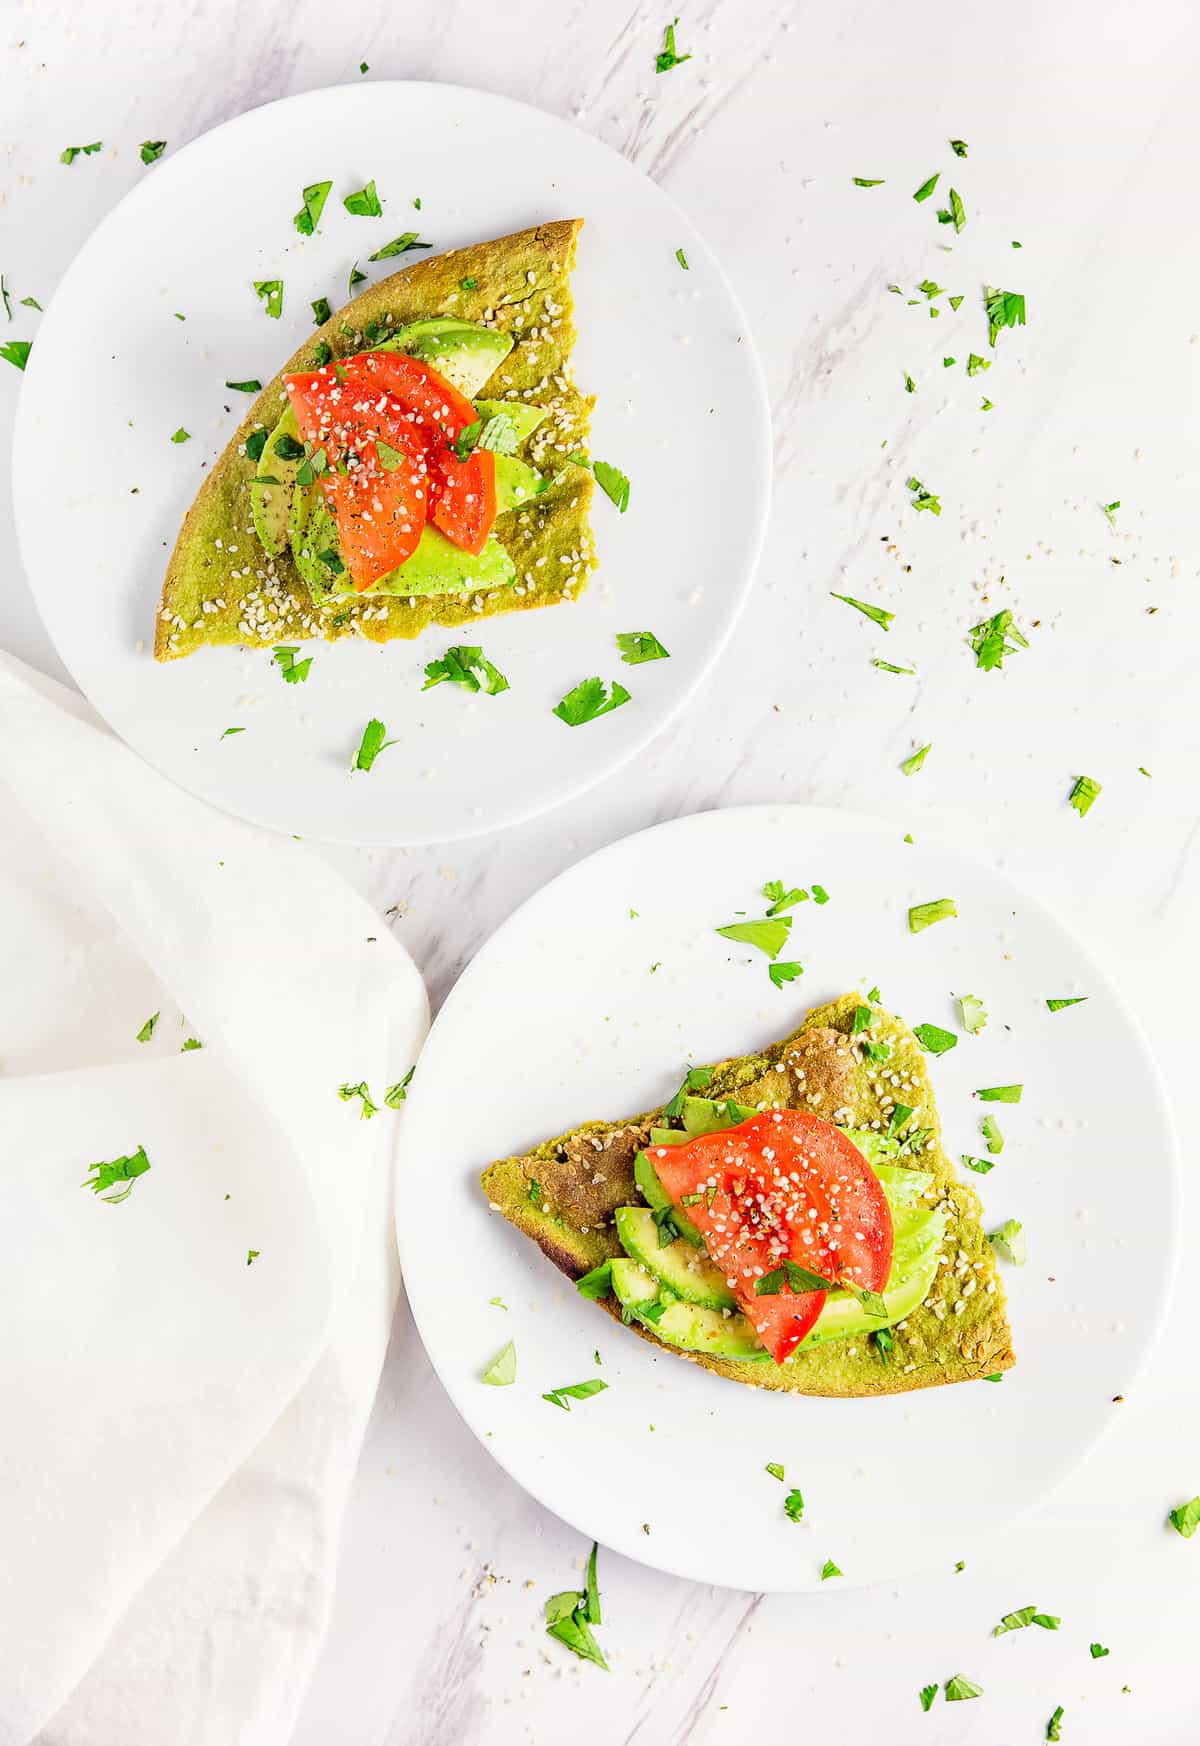
Ameera here! I love spinach and sesame seeds together. This variation turned out sooo good. We tore pieces of this Spinach and Sesame flatbread and then topped the pieces with sliced avocadoes and tomatoes. Then we sprinkled them with sea salt and hemp seeds. The flavor combination was divine!
Print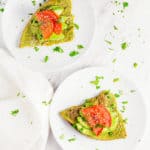
Spinach with Sesame Seeds Quinoa Flatbread
- Prep Time: 7 minutes
- Cook Time: 21 minutes
- Total Time: 28 minutes
- Yield: 1 Flatbread 1x
Description
This amazingly simple and easy Quinoa Flatbread is healthy and sure to be a new family favorite. You just may never buy bread again after tasting these delicious flatbreads. It is versatile and oh so yummy! A fabulous Whole Food Plant Based recipe. Oil free, sugar free, no processed ingredients.
Ingredients
- 1 cup quinoa – uncooked
- ½ cup + 1 Tablespoon unsweetened plain plant milk
- 1 teaspoon baking powder
- ¾ teaspoon sea salt
- ¾ cup packed fresh spinach
- Topping
- Sprinkle of sesame seeds
Instructions
- Preheat the oven to 425 degrees F.
- Line a 14 x 20 baking sheet with parchment paper (or use a silicone baking mat). Invert the parchment paper and trace an 11-inch diameter circle in the center of the parchment paper to use as a pouring guide. Flip the parchment paper over and place onto the baking sheet. You should be able to see the circle from the other side. Note: This step is not required, but it can be helpful.
- Place the dry quinoa in a fine mesh strainer and rinse the quinoa really well with running water for two minutes. This removes the bitterness from the quinoa. Shake to drain excess moisture.
- Add the rinsed quinoa, plant milk, baking powder, spinach, and sea salt into a high-speed blender and blend on high for one minute. When using our Vitamix, we use the tamper tool to help move the batter along until it was able to blend on its own. If you don’t help it along, then the batter doesn’t completely mix well and become smooth. The batter should be smooth without any visible quinoa remaining. With a Vitamix, it may take a little longer to completely blend the quinoa, about 2 minutes. Reference the photos to review the consistency. Additionally, since this is a small amount of batter, use the smaller Vitamix container.
- The batter consistency is key here. Since quinoa has slight variations of “dryness” depending on how old it is, you need to pay attention to the thickness of the batter. The batter should be somewhat thick, and pourable with the help of a rubber spatula to get it onto the parchment lined baking sheet. If the batter appears overly thick, then add a teaspoon (+) of plant milk to loosen it up.
- Drop the batter into the center of the circle that you drew on the parchment paper. Once you get pretty much get ALL the batter out of the high-speed blender, take a rubber spatula and start to spread it out. Working from the center, gently pushing the batter outwards until you reach the outline of the circle. The batter should be spread thin. Reference the photos on the blog post for reference.
- Sprinkle the top with sesame seeds
- Place the quinoa flatbread into the oven and bake for 15 minutes.
- After 15 minutes, remove the quinoa flatbread from the oven, then using a thin edged spatula, gently loosen the bread from the parchment paper, flip over, and then return to the oven for another 4 to 5 minutes for chewy. Bake 6 to 7 minutes for crispy, 6 minutes for crispy, 7 minutes for crispy and crunchy.
- Enjoy!
- See additional recipe variations.
Notes
*Quinoa Flatbread: This is not your typical soft flatbread. It is made from quinoa and is not soft and fluffy because it has no oil which typically gives a more fluffy and soft texture. It is however, very tasty and satisfying.
*Batter: The batter consistency is key. The batter should be thick, but should spread easily with a rubber spatula. It should look like a fudgy brownie batter, but very spreadable.
*Batter Thickness or rather thinness: Another key element is to spread the batter very very thin. The batter will not rise much, but since the batter is consisting of crushed quinoa you want the batter thin so it bakes thoroughly. If it is too thick, then your quinoa bread will be gummy.
*Baking Time: If you like your quinoa bread super crispy, follow the instructions on baking times. It is very important that you set and USE a timer for both the 1st side and flip side of the baking. Otherwise, you could end up with a gummy flatbread.
*Oven Preheat to 425 degrees F: It is very important that your oven is fully preheated before you begin the baking process.
*11-inch circle guide: The 11-inch circle guide works really well because it lets you know just how thin the batter should be when spreading it out.
*Flip side baking: After the 1st 15 minutes of baking, remove the baking sheet from the oven, use a long thin edged spatula and gently loosen the quinoa flatbread around all the edges. The baked bread will want to stick to the parchment paper, but trust me it comes loose with just a few tugs, then slide your spatula underneath the center of the flatbread, once it is fully loose, very carefully flip it over using tongs (be careful not to tear the flatbread.) It should flip over easily, then return the flatbread to the oven and do the flip-side baking. Be careful, it’s HOT!
*High Speed Blender: We use a Ninja High Speed Blender with great results. The key is that the quinoa must be broken down into a batter consistency. We used the “Auto IQ Ultra Blend” setting on our Ninja. Our regular food processor did not have the power to break down the quinoa.
#3: Chocolate Quinoa Flatbread
Ameera here! Of course, I couldn’t let this go by without attempting a chocolate version, right? We absolutely loved this version, but let me tell you a little more.
The chocolate and sweetness of this version is very light. It has a hint of chocolate and a hint of sweetness. We tried adding more chocolate and more maple sugar, but it did not improve the flavor. This flavor is like the old-fashioned drum stick chocolate waffle cone.
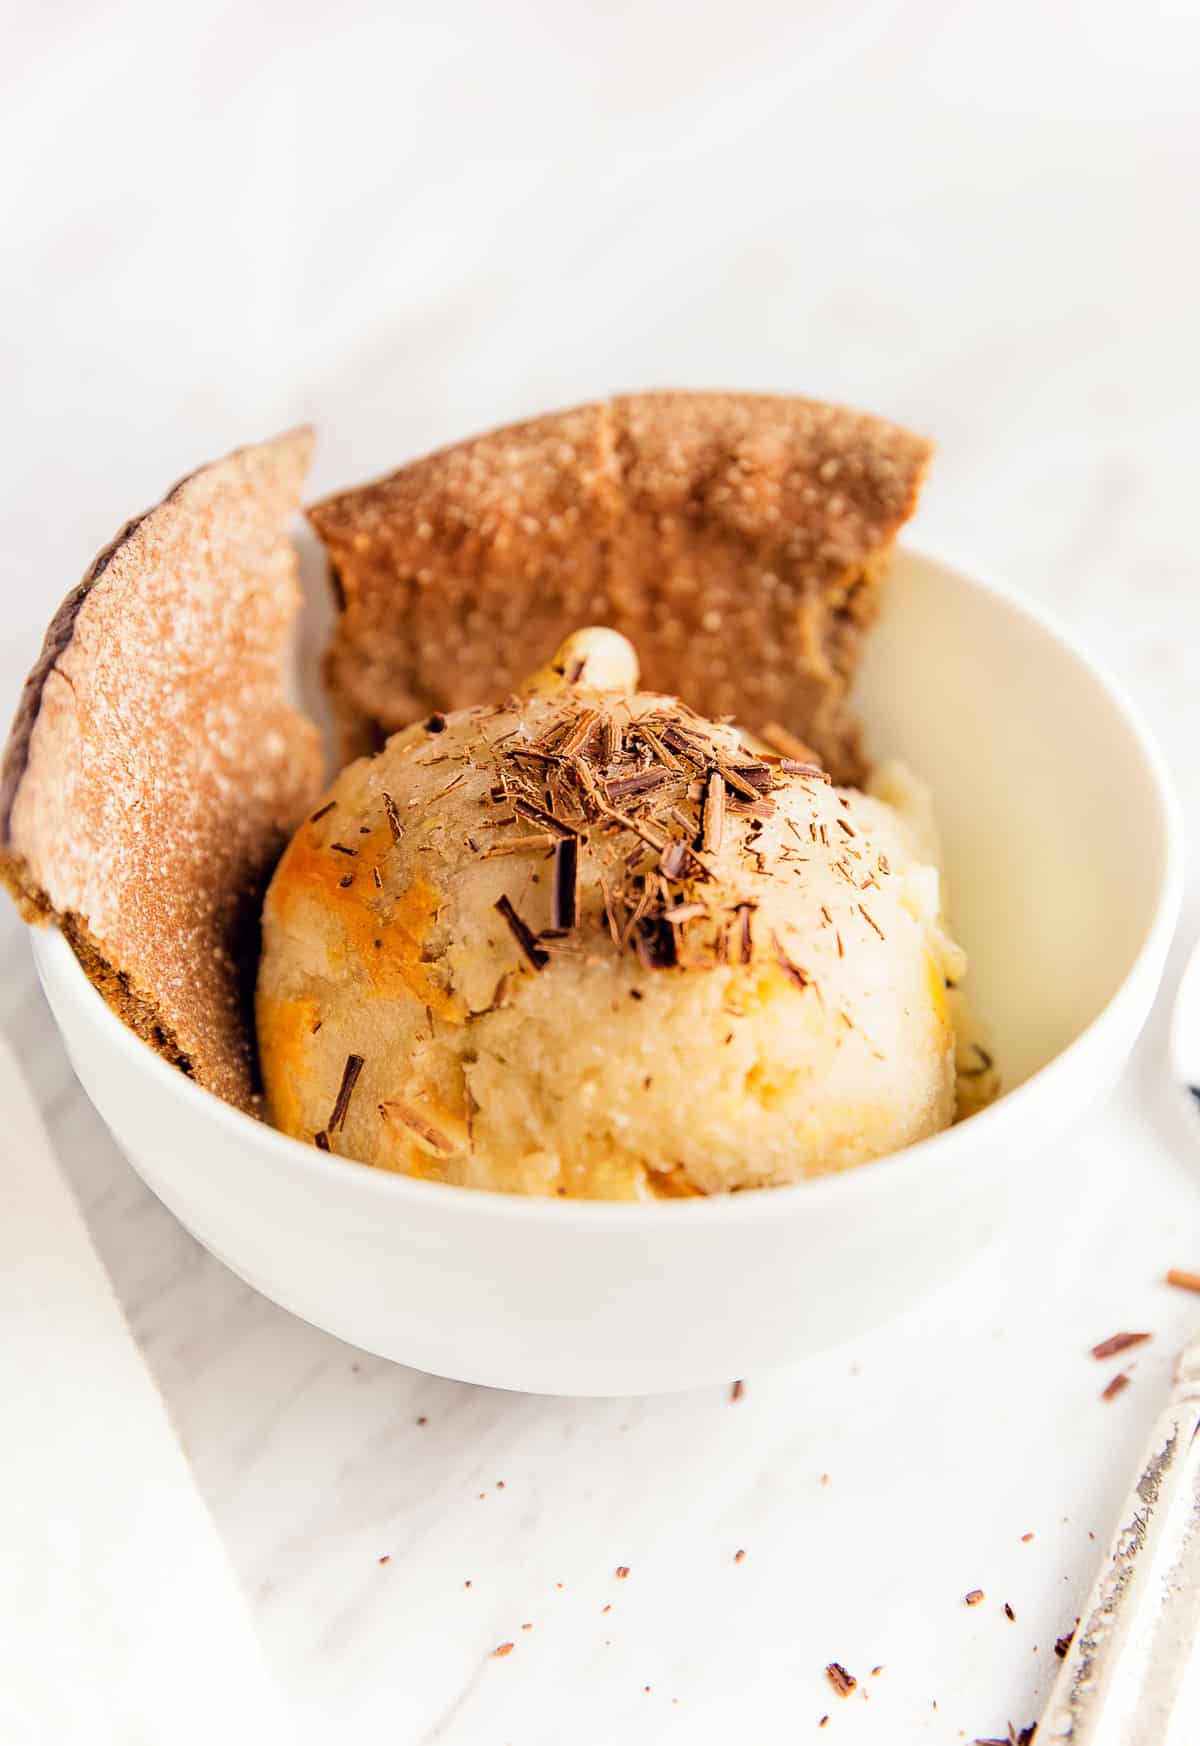
We paired it with our banana nice cream (frozen bananas and unsweetened plain almond milk) and we were loving it. We shaved a little bit of unsweetened dark chocolate on top of the nice cream and we were good to go. Use the chocolate quinoa flatbread like a spoon/scoop.
Note: If you are looking at this Chocolate Quinoa Flatbread as a dessert, then this variation is not going to be what you are expecting. It really is beautiful, but very light on flavor. We loved it accompanying our nice cream or a couple pieces for a light snack.
Print
Chocolate Quinoa Flatbread
- Prep Time: 7 minutes
- Cook Time: 21 minutes
- Total Time: 28 minutes
- Yield: 1 Flatbread 1x
Description
This amazingly simple and easy Quinoa Flatbread is healthy and sure to be a new family favorite. You just may never buy bread again after tasting these delicious flatbreads. It is versatile and oh so yummy! A fabulous Whole Food Plant Based recipe. Oil free, sugar free, no processed ingredients.
Ingredients
- 1 cup quinoa – uncooked
- ½ cup + 1 Tablespoon unsweetened plain almond milk (or other plant based milk)
- 1 teaspoon baking powder
- Pinch of sea salt
- 2 Tablespoons unsweetened cocoa powder
- 3 Tablespoons dry maple sugar
Instructions
- Preheat the oven to 425 degrees F.
- Line a 14 x 20 baking sheet with parchment paper (or silicone mat). Invert the parchment paper and trace an 11-inch diameter circle in the center of the parchment paper to use as a pouring guide. Flip the parchment paper over and place onto the baking sheet. You should be able to see the circle from the other side. Note: This step is not required, but for some it can be helpful.
- Place the dry quinoa in a fine mesh strainer and rinse the quinoa really well with running water for two minutes. This removes the bitterness from the quinoa. Shake to drain excess moisture.
- Add the rinsed quinoa, plant milk, baking powder, and sea salt into a high-speed blender and blend on high for one minute. When using our Vitamix, we use the tamper tool to help move the batter along until it was able to blend on its own. If you don’t help it along, then the batter doesn’t completely mix well and become smooth. The batter should be smooth without any visible quinoa remaining. With a Vitamix, it may take a little longer to completely blend the quinoa, about 2 minutes. Reference the photos to review the consistency. Additionally, since this is a small amount of batter, use the smaller Vitamix container.
- The batter consistency is key here. Since quinoa has slight variations of “dryness” depending on how old it is, you need to pay attention to the thickness of the batter. The batter should be somewhat thick, and pourable with the help of a rubber spatula to get it onto the parchment lined baking sheet. If the batter appears overly thick, then add a teaspoon (+) of plant milk to loosen it up.
- Drop the batter into the center of the circle that you drew on the parchment paper. Once you get pretty much get ALL the batter out of the high-speed blender, take a rubber spatula and start to spread it out. Working from the center, gently pushing the batter outwards until you reach the outline of the circle. The batter should be spread thin. Reference the photos on the blog post for reference.
- Place the quinoa flatbread into the oven and bake for 15 minutes.
- After 15 minutes, remove the quinoa flatbread from the oven, then using a thin edged spatula, gently loosen the bread from the parchment paper, flip over, and then return to the oven for another 4 to 5 minutes for chewy. Bake 6 to 7 minutes for crispy, 6 minutes for crispy, 7 minutes for crispy and crunchy.
- Enjoy!
- See additional recipe variations.
Notes
*Quinoa Flatbread: This is not your typical soft flatbread. It is made from quinoa and is not soft and fluffy because it has no oil which typically gives a more fluffy and soft texture. It is however, very tasty and satisfying.
*Batter: The batter consistency is key. The batter should be thick, but should spread easily with a rubber spatula. It should look like a fudgy brownie batter, but very spreadable.
*Batter Thickness or rather thinness: Another key element is to spread the batter very very thin. The batter will not rise much, but since the batter is consisting of crushed quinoa you want the batter thin so it bakes thoroughly. If it is too thick, then your quinoa bread will be gummy.
*Baking Time: If you like your quinoa bread super crispy, follow the instructions on baking times. It is very important that you set and USE a timer for both the 1st side and flip side of the baking. Otherwise, you could end up with a gummy flatbread.
*Oven Preheat to 425 degrees F: It is very important that your oven is fully preheated before you begin the baking process.
*11-inch circle guide: The 11-inch circle guide works really well because it lets you know just how thin the batter should be when spreading it out.
*Flip side baking: After the 1st 15 minutes of baking, remove the baking sheet from the oven, use a long thin edged spatula and gently loosen the quinoa flatbread around all the edges. The baked bread will want to stick to the parchment paper, but trust me it comes loose with just a few tugs, then slide your spatula underneath the center of the flatbread, once it is fully loose, very carefully flip it over using tongs (be careful not to tear the flatbread.) It should flip over easily, then return the flatbread to the oven and do the flip-side baking. Be careful, it’s HOT!
*High Speed Blender: We use a Ninja High Speed Blender with great results. The key is that the quinoa must be broken down into a batter consistency. We used the “Auto IQ Ultra Blend” setting on our Ninja. Our regular food processor did not have the power to break down the quinoa.
#4: Red Hot Quinoa Flatbread
Robin here! I really miss chips. I mean REALLY miss them… *sigh* Every store-bought chip out there has oil, even if it is baked! Crazy huh? So there literally isn’t a chip available for purchasing.
I love spicy chips so when Monkey wanted to make these quinoa flatbreads, I didn’t want to miss an opportunity to make some kind of spicy, crunchy flatbread.
If you bake this flatbread just a tiny bit longer in the oven, you end up with this super crunchy and deliciously spicy flatbread. I was literally devouring it as soon as it came out of the oven. It was so satisfying and good.
The only thing I would offer on this one is that in order to get that BIG crunch, you have to bake it a little longer, then you have to expect some extra brown surfaces which was OK by me. The crunchiness was ohhh so worth it. Try this, you will love it!
Print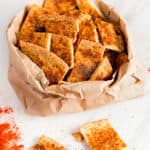
Red Hot Quinoa Flatbread
- Prep Time: 7 minutes
- Cook Time: 21 minutes
- Total Time: 28 minutes
- Yield: 1 Flatbread 1x
Description
This amazingly simple and easy Quinoa Flatbread is healthy and sure to be a new family favorite. You just may never buy bread again after tasting these delicious flatbreads. It is versatile and oh so yummy! A fabulous Whole Food Plant Based recipe. Oil free, sugar free, no processed ingredients.
Ingredients
- 1 cup quinoa – uncooked
- ½ cup + 1 Tablespoon unsweetened plain plant milk
- 1 teaspoon baking powder
- ½ teaspoon sea salt
- A dash of cayenne pepper
- Topping Mix – Red Hot Seasoning mix (Combined)
- ½ teaspoon sweet paprika
- ½ teaspoon chili powder
- 1/8 teaspoon onion powder
- 1/8 teaspoon garlic powder
- 1/8 teaspoon chipotle pepper
- A dash cayenne pepper
- 1/8 teaspoon sea salt
Instructions
- Preheat the oven to 425 degrees F.
- Line a 14 x 20 baking sheet with parchment paper (or silicone baking mat). Invert the parchment paper and trace an 11-inch diameter circle in the center of the parchment paper to use as a pouring guide. Flip the parchment paper over and place onto the baking sheet. You should be able to see the circle from the other side. Note: This step is not required, but for some it can be helpful.
- Place the dry quinoa in a fine mesh strainer and rinse the quinoa really well with running water for two minutes. This removes the bitterness from the quinoa. Shake to drain excess moisture.
- Add the rinsed quinoa, plant milk, baking powder, and sea salt into a high-speed blender and blend on high for one minute. When using our Vitamix, we use the tamper tool to help move the batter along until it was able to blend on its own. If you don’t help it along, then the batter doesn’t completely mix well and become smooth. The batter should be smooth without any visible quinoa remaining. With a Vitamix, it may take a little longer to completely blend the quinoa, about 2 minutes. Reference the photos to review the consistency. Additionally, since this is a small amount of batter, use the smaller Vitamix container.
- The batter consistency is key here. Since quinoa has slight variations of “dryness” depending on how old it is, you need to pay attention to the thickness of the batter. The batter should be somewhat thick, and pourable with the help of a rubber spatula to get it onto the parchment lined baking sheet. If the batter appears overly thick, then add a teaspoon (+) of plant milk to loosen it up.
- Drop the batter into the center of the circle that you drew on the parchment paper. Once you get pretty much get ALL the batter out of the high-speed blender, take a rubber spatula and start to spread it out. Working from the center, gently pushing the batter outwards until you reach the outline of the circle. The batter should be spread thin. Reference the photos on the blog post for reference.
- Sprinkle the top with Topping Mix of the Red Hot Seasoning mix listed above
- Place the quinoa flatbread into the oven and bake for 15 minutes.
- After 15 minutes, remove the quinoa flatbread from the oven, then using a thin edged spatula, gently loosen the bread from the parchment paper, flip over, and then return to the oven for another 4 to 5 minutes for chewy. Bake 6 to 7 minutes for crispy, 6 minutes for crispy, 7 minutes for crispy and crunchy.
- Enjoy!
- See additional recipe variations.
Notes
*Quinoa Flatbread: This is not your typical soft flatbread. It is made from quinoa and is not soft and fluffy because it has no oil which typically gives a more fluffy and soft texture. It is however, very tasty and satisfying.
*Batter: The batter consistency is key. The batter should be thick, but should spread easily with a rubber spatula. It should look like a fudgy brownie batter, but very spreadable.
*Batter Thickness or rather thinness: Another key element is to spread the batter very very thin. The batter will not rise much, but since the batter is consisting of crushed quinoa you want the batter thin so it bakes thoroughly. If it is too thick, then your quinoa bread will be gummy.
*Baking Time: If you like your quinoa bread super crispy, follow the instructions on baking times. It is very important that you set and USE a timer for both the 1st side and flip side of the baking. Otherwise, you could end up with a gummy flatbread.
*Oven Preheat to 425 degrees F: It is very important that your oven is fully preheated before you begin the baking process.
*11-inch circle guide: The 11-inch circle guide works really well because it lets you know just how thin the batter should be when spreading it out.
*Flip side baking: After the 1st 15 minutes of baking, remove the baking sheet from the oven, use a long thin edged spatula and gently loosen the quinoa flatbread around all the edges. The baked bread will want to stick to the parchment paper, but trust me it comes loose with just a few tugs, then slide your spatula underneath the center of the flatbread, once it is fully loose, very carefully flip it over using tongs (be careful not to tear the flatbread.) It should flip over easily, then return the flatbread to the oven and do the flip-side baking. Be careful, it’s HOT!
*High Speed Blender: We use a Ninja High Speed Blender with great results. The key is that the quinoa must be broken down into a batter consistency. We used the “Auto IQ Ultra Blend” setting on our Ninja. Our regular food processor did not have the power to break down the quinoa.
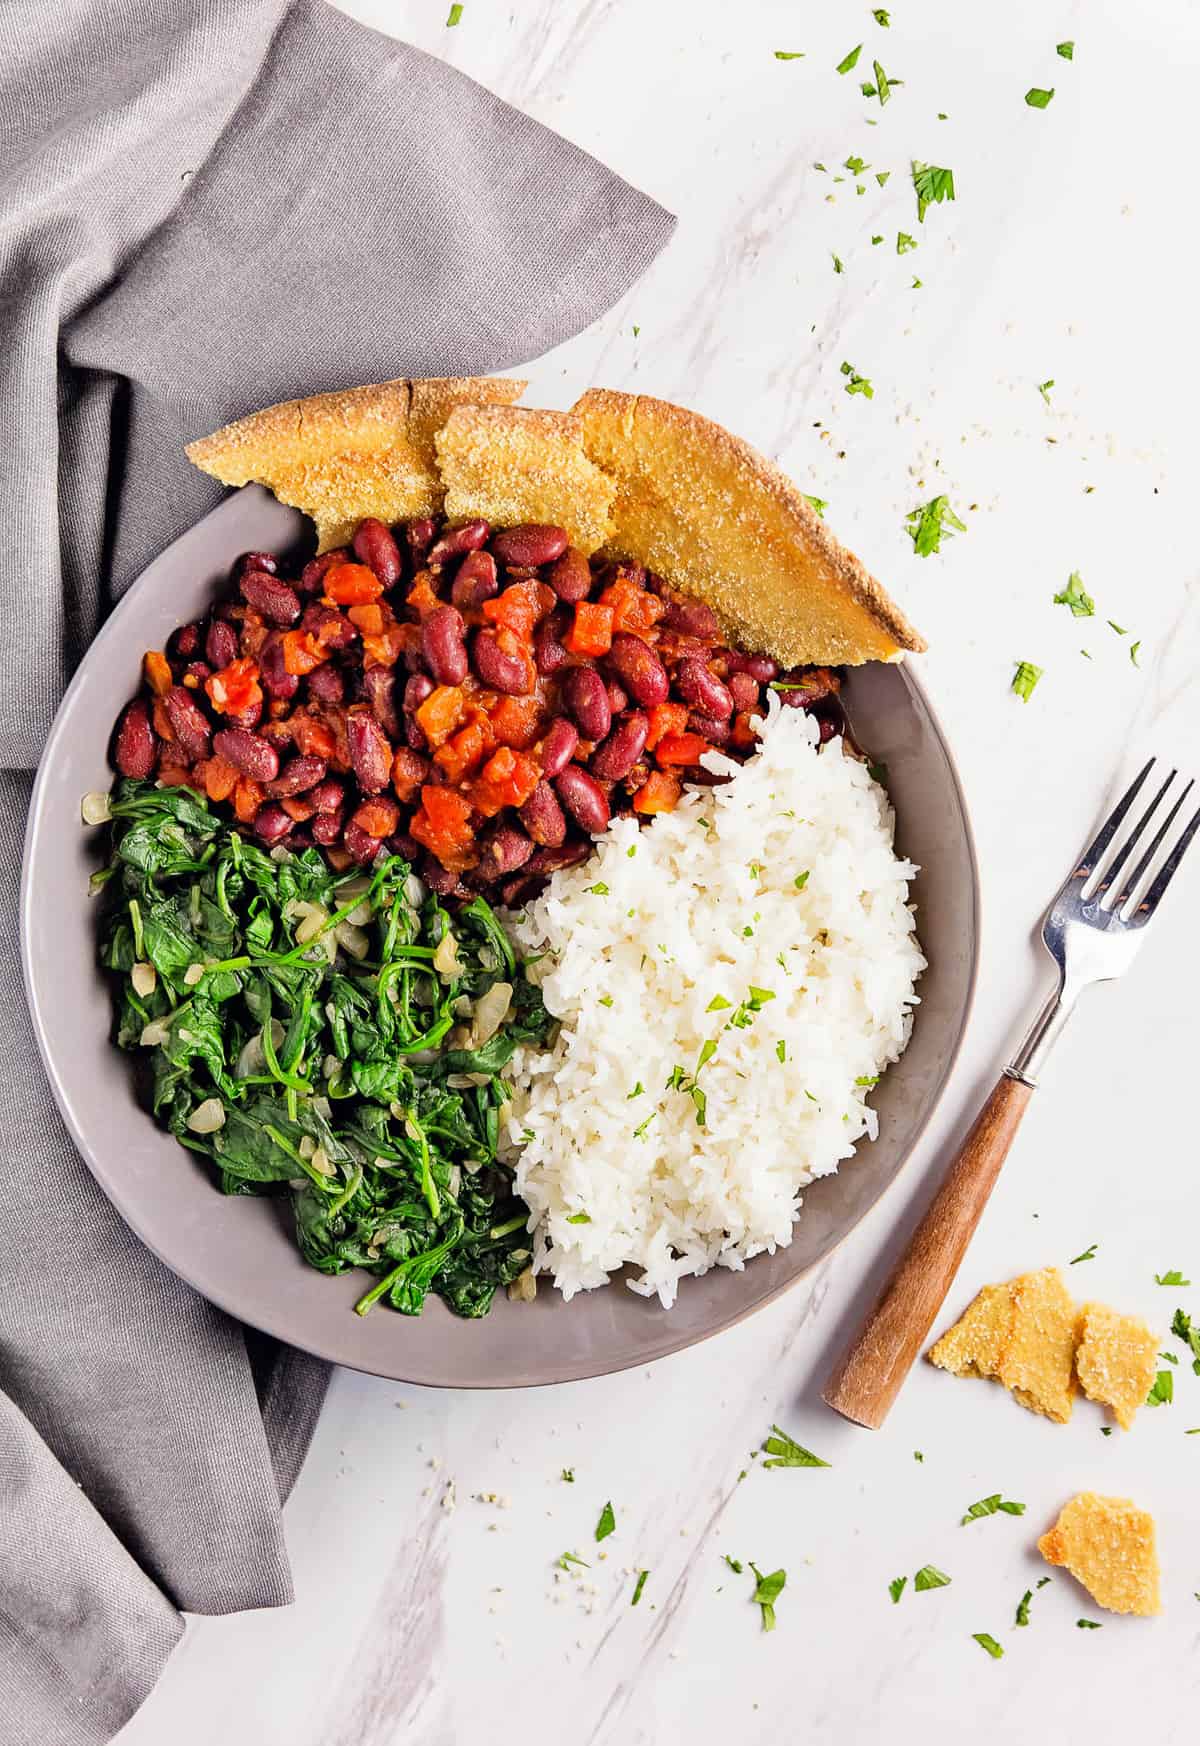
#5: Cornbread Quinoa Flatbread
Robin here! I love cornbread. I grew up eating tons of cornbread! This flatbread has a wonderful light corn flavor with just a hint of sweetness.
I especially love to couple it with Cajun red beans and tomatoes, sautéed spinach, and rice. I like to use it to soak up the Cajun red beans and seasoning juice, so gosh darn good!
Print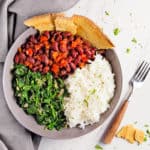
Cornbread Quinoa Flatbread
- Prep Time: 7 minutes
- Cook Time: 21 minutes
- Total Time: 28 minutes
- Yield: 1 Flatbread 1x
Description
This amazingly simple and easy Quinoa Flatbread is healthy and sure to be a new family favorite. You just may never buy bread again after tasting these delicious flatbreads. It is versatile and oh so yummy! A fabulous Whole Food Plant Based recipe. Oil free, sugar free, no processed ingredients.
Ingredients
- 1 cup quinoa – uncooked
- ½ cup, plus 1 Tablespoon unsweetened plain plant milk
- 1 teaspoon baking powder
- ¾ teaspoon sea salt
- ¼ cup cornmeal
- 2 Tablespoons dry maple sugar
- Topping:
- Sprinkle extra cornmeal
Instructions
- Preheat the oven to 425 degrees F.
- Line a 14 x 20 baking sheet with parchment paper. Invert the parchment paper and trace an 11-inch diameter circle in the center of the parchment paper to use as a pouring guide. Flip the parchment paper over and place onto the baking sheet. You should be able to see the circle from the other side. Note: This step is not required, but for some it can be helpful.
- Place the dry quinoa in a fine mesh strainer and rinse the quinoa really well with running water for two minutes. This removes the bitterness from the quinoa. Shake to drain excess moisture.
- Add the rinsed quinoa, plant milk, baking powder, and sea salt into a high-speed blender and blend on high for one minute. When using our Vitamix, we use the tamper tool to help move the batter along until it was able to blend on its own. If you don’t help it along, then the batter doesn’t completely mix well and become smooth. The batter should be smooth without any visible quinoa remaining. With a Vitamix, it may take a little longer to completely blend the quinoa, about 2 minutes. Reference the photos to review the consistency. Additionally, since this is a small amount of batter, use the smaller Vitamix container.
- The batter consistency is key here. Since quinoa has slight variations of “dryness” depending on how old it is, you need to pay attention to the thickness of the batter. The batter should be somewhat thick, and pourable with the help of a rubber spatula to get it onto the parchment lined baking sheet. If the batter appears overly thick, then add a teaspoon (+) of plant milk to loosen it up.
- Drop the batter into the center of the circle that you drew on the parchment paper. Once you get pretty much get ALL the batter out of the high-speed blender, take a rubber spatula and start to spread it out. Working from the center, gently pushing the batter outwards until you reach the outline of the circle. The batter should be spread thin. Reference the photos on the blog post for reference.
- Sprinkle the top with a little cornmeal
- Place the quinoa flatbread into the oven and bake for 15 minutes.
- After 15 minutes, remove the quinoa flatbread from the oven, then using a thin edged spatula, gently loosen the bread from the parchment paper, flip over, and then return to the oven for another 4 to 5 minutes for chewy. Bake 6 to 7 minutes for crispy, 6 minutes for crispy, 7 minutes for crispy and crunchy.
- Enjoy!
- See additional recipe variations.
Notes
*Quinoa Flatbread: This is not your typical soft flatbread. It is made from quinoa and is not soft and fluffy because it has no oil which typically gives a more fluffy and soft texture. It is however, very tasty and satisfying.
*Batter: The batter consistency is key. The batter should be thick, but should spread easily with a rubber spatula. It should look like a fudgy brownie batter, but very spreadable.
*Batter Thickness or rather thinness: Another key element is to spread the batter very very thin. The batter will not rise much, but since the batter is consisting of crushed quinoa you want the batter thin so it bakes thoroughly. If it is too thick, then your quinoa bread will be gummy.
*Baking Time: If you like your quinoa bread super crispy, follow the instructions on baking times. It is very important that you set and USE a timer for both the 1st side and flip side of the baking. Otherwise, you could end up with a gummy flatbread.
*Oven Preheat to 425 degrees F: It is very important that your oven is fully preheated before you begin the baking process.
*11-inch circle guide: The 11-inch circle guide works really well because it lets you know just how thin the batter should be when spreading it out.
*Flip side baking: After the 1st 15 minutes of baking, remove the baking sheet from the oven, use a long thin edged spatula and gently loosen the quinoa flatbread around all the edges. The baked bread will want to stick to the parchment paper, but trust me it comes loose with just a few tugs, then slide your spatula underneath the center of the flatbread, once it is fully loose, very carefully flip it over using tongs (be careful not to tear the flatbread.) It should flip over easily, then return the flatbread to the oven and do the flip-side baking. Be careful, it’s HOT!
*High Speed Blender: We use a Ninja High Speed Blender with great results. The key is that the quinoa must be broken down into a batter consistency. We used the “Auto IQ Ultra Blend” setting on our Ninja. Our regular food processor did not have the power to break down the quinoa.
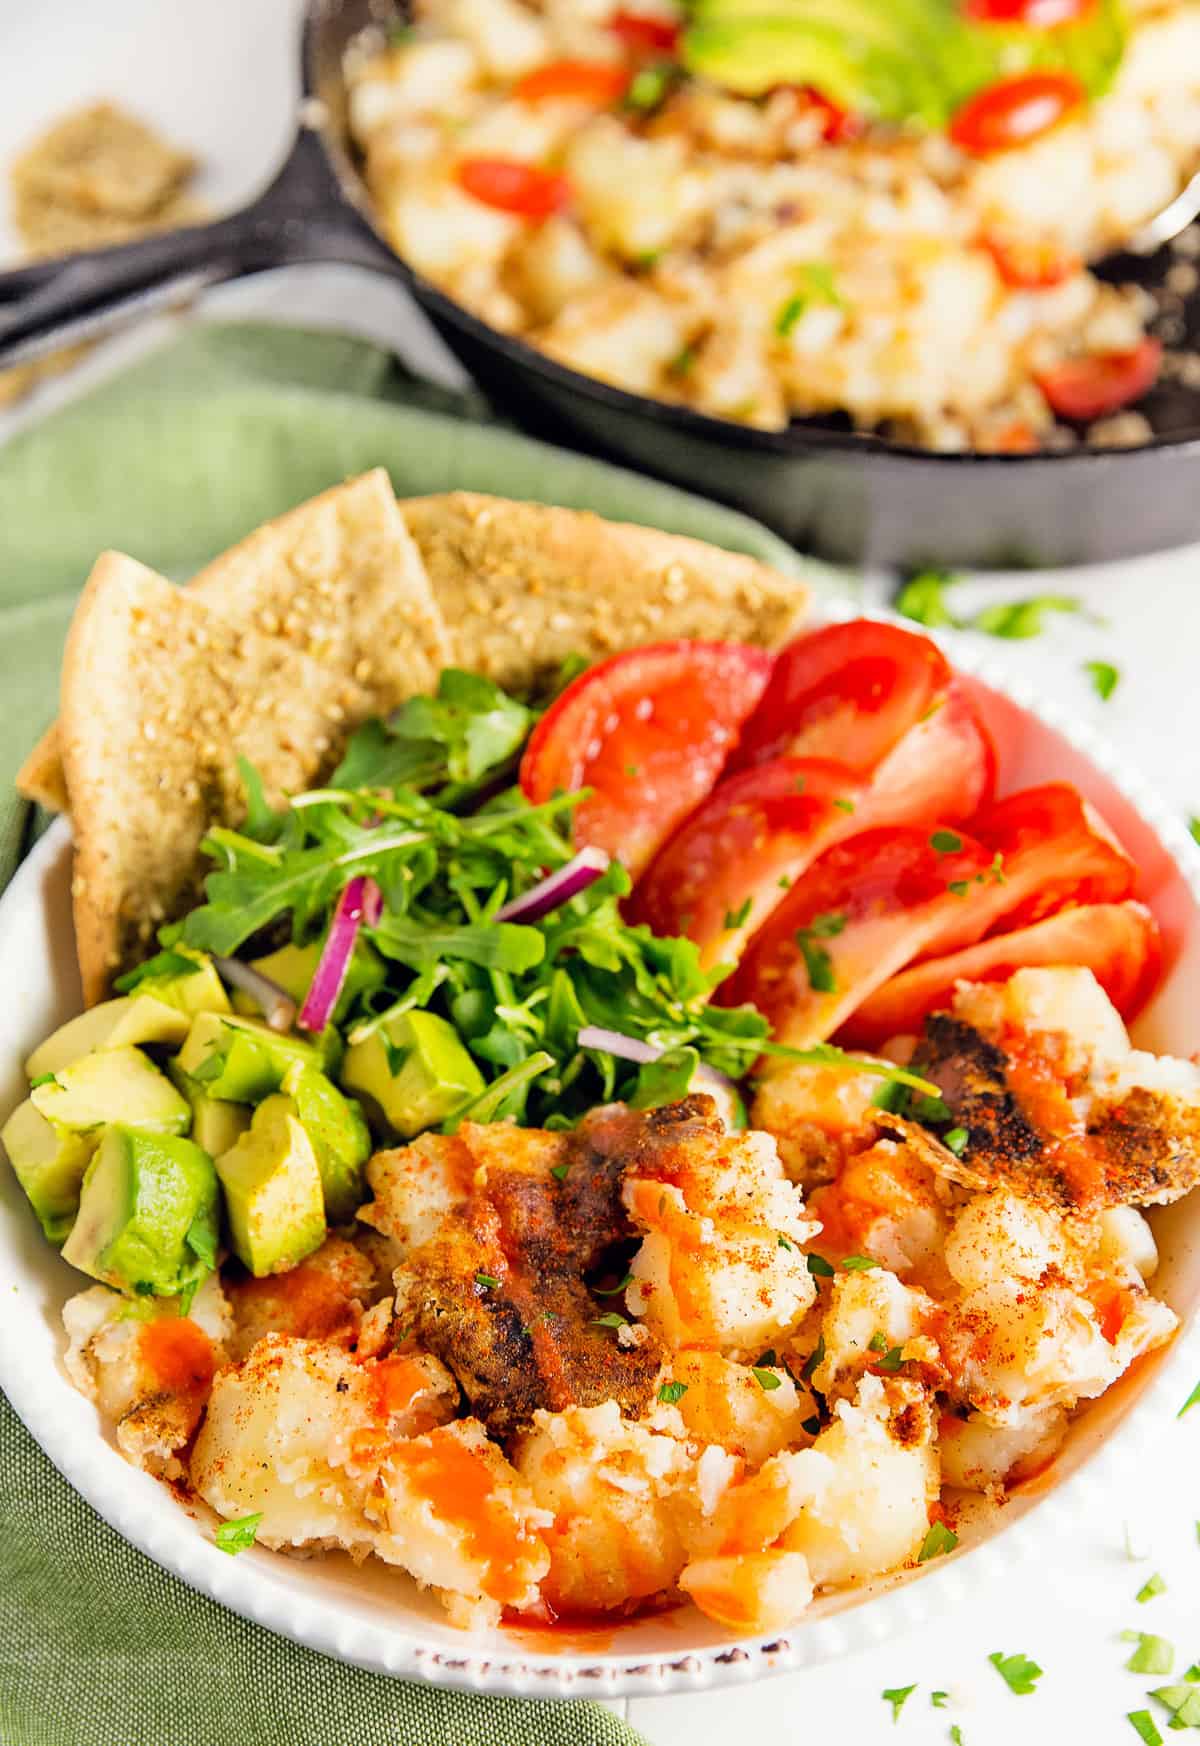
#6: Zaatar Quinoa Flatbread
Ameera here! Zaatar bread (zaatar manoushi) is a traditional Middle Eastern flatbread made with wheat flour. The zaatar seasoning is traditionally mixed with lemon juice and olive oil creating a paste, then spread onto a flatbread.
I knew it might be slightly challenging since we left out the lemon juice and olive oil, but it turned out super tasty. I had Michael test drive it and he enjoyed it. WIN-WIN!
Zaatar bread is traditionally eaten for breakfast, and I enjoyed pairing it with out Hash Brown Potato Bowl 🙂
Print
Zaatar Quinoa Flatbread
- Prep Time: 7 minutes
- Cook Time: 21 minutes
- Total Time: 28 minutes
- Yield: 1 Flatbread 1x
Description
This amazingly simple and easy Quinoa Flatbread is healthy and sure to be a new family favorite. You just may never buy bread again after tasting these delicious flatbreads. It is versatile and oh so yummy! A fabulous Whole Food Plant Based recipe. Oil free, sugar free, no processed ingredients.
Ingredients
- 1 cup quinoa – uncooked
- ½ cup + 1 Tablespoon unsweetened plain plant milk
- 1 teaspoon baking powder
- ¾ teaspoon sea salt
- Topping:
- Generous sprinkle of zaatar seasonin
Instructions
- Preheat the oven to 425 degrees F.
- Line a 14 x 20 baking sheet with parchment paper (or silicone baking mat). Invert the parchment paper and trace an 11-inch diameter circle in the center of the parchment paper to use as a pouring guide. Flip the parchment paper over and place onto the baking sheet. You should be able to see the circle from the other side. Note: This step is not required, but for some it can be helpful.
- Place the dry quinoa in a fine mesh strainer and rinse the quinoa really well with running water for two minutes. This removes the bitterness from the quinoa. Shake to drain excess moisture.
- Add the rinsed quinoa, plant milk, baking powder, and sea salt into a high-speed blender and blend on high for one minute. When using our Vitamix, we use the tamper tool to help move the batter along until it was able to blend on its own. If you don’t help it along, then the batter doesn’t completely mix well and become smooth. The batter should be smooth without any visible quinoa remaining. With a Vitamix, it may take a little longer to completely blend the quinoa, about 2 minutes. Reference the photos to review the consistency. Additionally, since this is a small amount of batter, use the smaller Vitamix container.
- The batter consistency is key here. Since quinoa has slight variations of “dryness” depending on how old it is, you need to pay attention to the thickness of the batter. The batter should be somewhat thick, and pourable with the help of a rubber spatula to get it onto the parchment lined baking sheet. If the batter appears overly thick, then add a teaspoon (+) of plant milk to loosen it up.
- Drop the batter into the center of the circle that you drew on the parchment paper. Once you get pretty much get ALL the batter out of the high-speed blender, take a rubber spatula and start to spread it out. Working from the center, gently pushing the batter outwards until you reach the outline of the circle. The batter should be spread thin. Reference the photos on the blog post for reference.
- Sprinkle the top generously with zaatar seasoning
- Place the quinoa flatbread into the oven and bake for 15 minutes.
- After 15 minutes, remove the quinoa flatbread from the oven, then using a thin edged spatula, gently loosen the bread from the parchment paper, flip over, and then return to the oven for another 4 to 5 minutes for chewy. Bake 6 to 7 minutes for crispy, 6 minutes for crispy, 7 minutes for crispy and crunchy.
- Enjoy!
- See additional recipe variations.
Notes
*Quinoa Flatbread: This is not your typical soft flatbread. It is made from quinoa and is not soft and fluffy because it has no oil which typically gives a more fluffy and soft texture. It is however, very tasty and satisfying.
*Batter: The batter consistency is key. The batter should be thick, but should spread easily with a rubber spatula. It should look like a fudgy brownie batter, but very spreadable.
*Batter Thickness or rather thinness: Another key element is to spread the batter very very thin. The batter will not rise much, but since the batter is consisting of crushed quinoa you want the batter thin so it bakes thoroughly. If it is too thick, then your quinoa bread will be gummy.
*Baking Time: If you like your quinoa bread super crispy, follow the instructions on baking times. It is very important that you set and USE a timer for both the 1st side and flip side of the baking. Otherwise, you could end up with a gummy flatbread.
*Oven Preheat to 425 degrees F: It is very important that your oven is fully preheated before you begin the baking process.
*11-inch circle guide: The 11-inch circle guide works really well because it lets you know just how thin the batter should be when spreading it out.
*Flip side baking: After the 1st 15 minutes of baking, remove the baking sheet from the oven, use a long thin edged spatula and gently loosen the quinoa flatbread around all the edges. The baked bread will want to stick to the parchment paper, but trust me it comes loose with just a few tugs, then slide your spatula underneath the center of the flatbread, once it is fully loose, very carefully flip it over using tongs (be careful not to tear the flatbread.) It should flip over easily, then return the flatbread to the oven and do the flip-side baking. Be careful, it’s HOT!
*High Speed Blender: We use a Ninja High Speed Blender with great results. The key is that the quinoa must be broken down into a batter consistency. We used the “Auto IQ Ultra Blend” setting on our Ninja. Our regular food processor did not have the power to break down the quinoa.
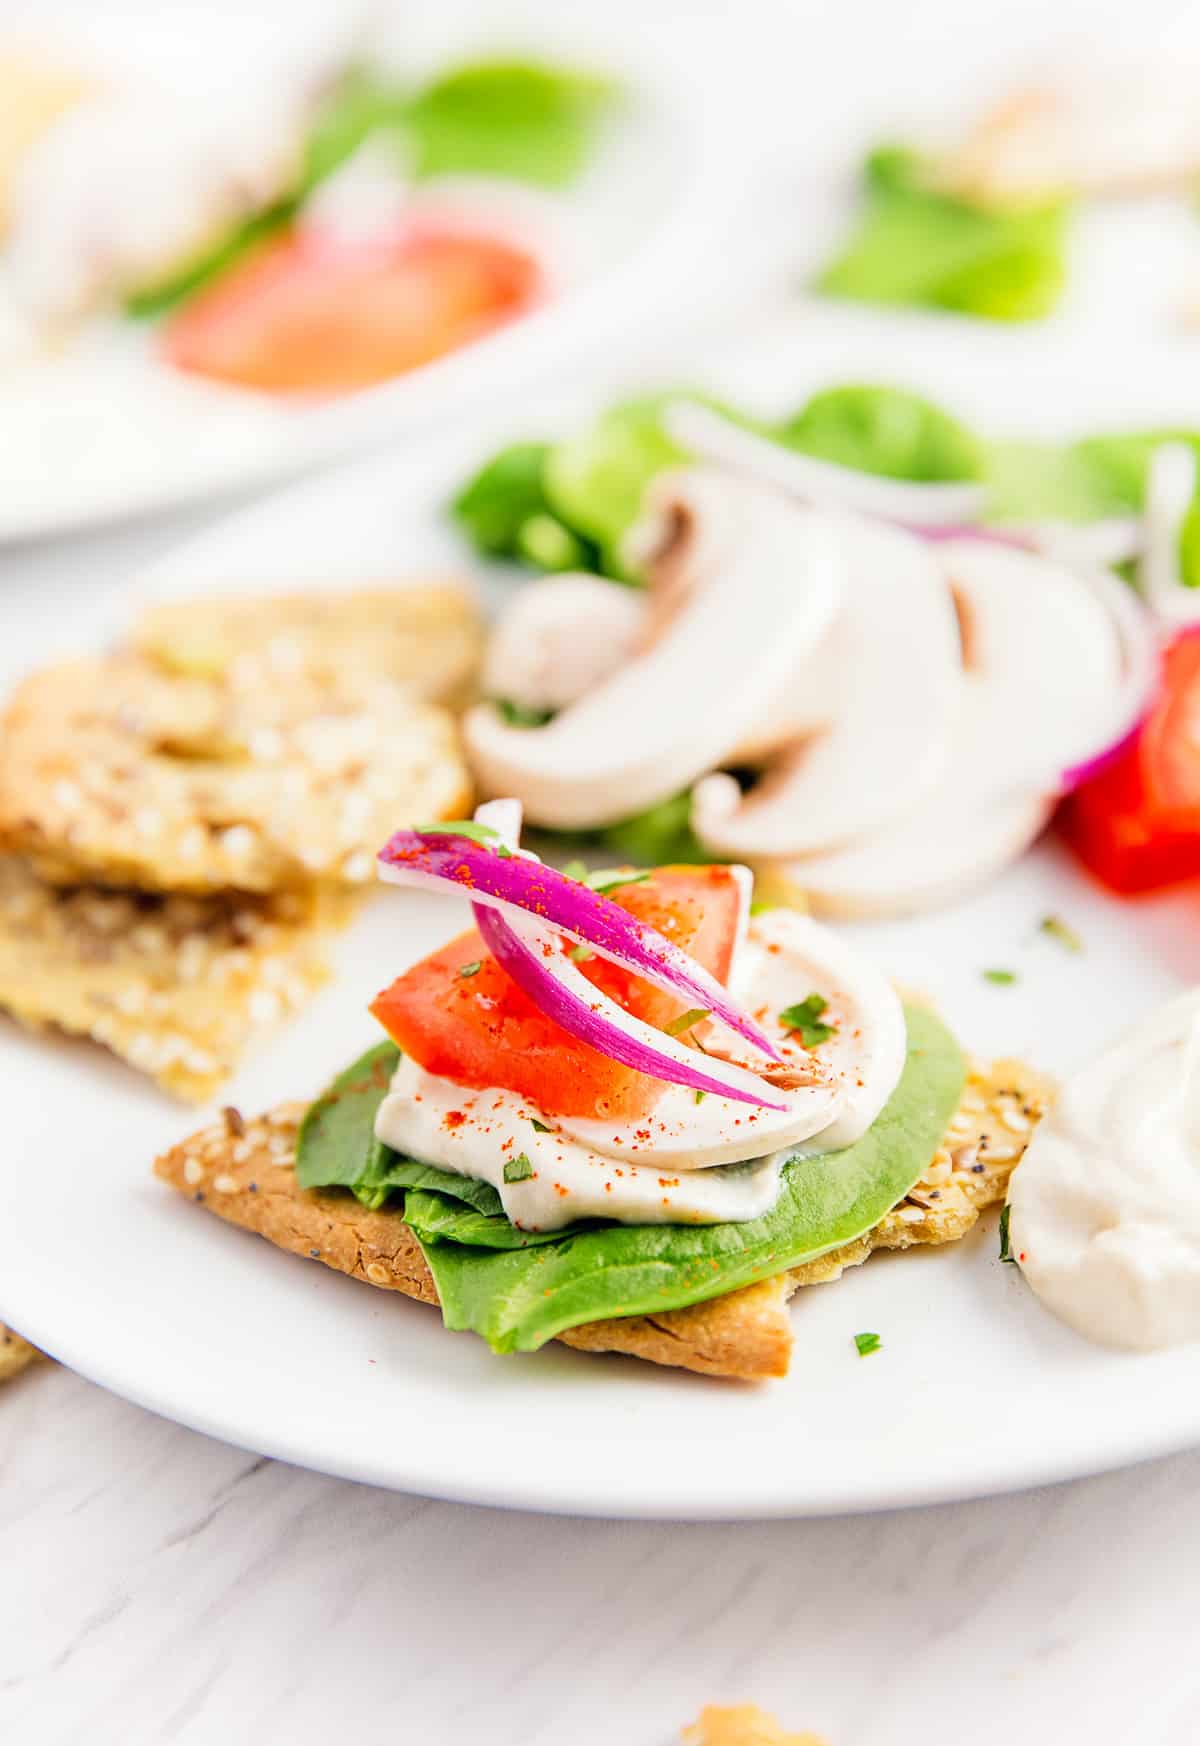
#7: Six Super Seeds Quinoa Flatbread
Robin here! This one is super delicious. The seeds add wonderful flavor to this flatbread.
We made a WFPB compliant cream cheese and spread it onto torn pieces of the Six Super Seeds Quinoa Flatbread, then added a spinach leaf, thinly sliced tomato, button mushroom slice, and a sliver or two of red onion, and a sprinkle of sweet paprika and flat leaf parsley – ohhhhh my gosh, soooo gosh darned good!
Print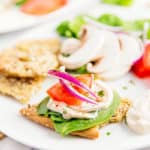
Six Super Seeds Quinoa Flatbread
- Prep Time: 7 minutes
- Cook Time: 21 minutes
- Total Time: 28 minutes
- Yield: 1 Flatbread 1x
Description
This amazingly simple and easy Quinoa Flatbread is healthy and sure to be a new family favorite. You just may never buy bread again after tasting these delicious flatbreads. It is versatile and oh so yummy! A fabulous Whole Food Plant Based recipe. Oil free, sugar free, no processed ingredients.
Ingredients
- 1 cup quinoa – uncooked
- ½ cup + 1 Tablespoon unsweetened plain plant milk
- 1 teaspoon baking powder
- ¾ teaspoon sea salt
- Toppings:
- Sprinkle of sesame seeds
- Sprinkle of poppy seeds
- Sprinkle of hemp seeds
- Sprinkle of pepitas (pumpkin seeds)
- Sprinkle of golden flax seeds
- Sprinkle of sunflower seeds
Instructions
- Preheat the oven to 425 degrees F.
- Line a 14 x 20 baking sheet with parchment paper (or silicone mat). Invert the parchment paper and trace an 11-inch diameter circle in the center of the parchment paper to use as a pouring guide. Flip the parchment paper over and place onto the baking sheet. You should be able to see the circle from the other side. Note: This step is not required, but for some it can be helpful.
- Place the dry quinoa in a fine mesh strainer and rinse the quinoa really well with running water for two minutes. This removes the bitterness from the quinoa. Shake to drain excess moisture.
- Add the rinsed quinoa, plant milk, baking powder, and sea salt into a high-speed blender and blend on high for one minute. When using our Vitamix, we use the tamper tool to help move the batter along until it was able to blend on its own. If you don’t help it along, then the batter doesn’t completely mix well and become smooth. The batter should be smooth without any visible quinoa remaining. With a Vitamix, it may take a little longer to completely blend the quinoa, about 2 minutes. Reference the photos to review the consistency. Additionally, since this is a small amount of batter, use the smaller Vitamix container.
- The batter consistency is key here. Since quinoa has slight variations of “dryness” depending on how old it is, you need to pay attention to the thickness of the batter. The batter should be somewhat thick, and pourable with the help of a rubber spatula to get it onto the parchment lined baking sheet. If the batter appears overly thick, then add a teaspoon (+) of plant milk to loosen it up.
- Drop the batter into the center of the circle that you drew on the parchment paper. Once you get pretty much get ALL the batter out of the high-speed blender, take a rubber spatula and start to spread it out. Working from the center, gently pushing the batter outwards until you reach the outline of the circle. The batter should be spread thin. Reference the photos on the blog post for reference.
- Sprinkle the top with sesame seeds, poppy seeds, hemp seeds, pepitas (pumpkin seeds), golden flax seeds, and sunflower seeds.
- Place the quinoa flatbread into the oven and bake for 15 minutes.
- After 15 minutes, remove the quinoa flatbread from the oven, then using a thin edged spatula, gently loosen the bread from the parchment paper, flip over, and then return to the oven for another 4 to 5 minutes for chewy. Bake 6 to 7 minutes for crispy, 6 minutes for crispy, 7 minutes for crispy and crunchy.
- Enjoy!
- See additional recipe variations.
Notes
*Quinoa Flatbread: This is not your typical soft flatbread. It is made from quinoa and is not soft and fluffy because it has no oil which typically gives a more fluffy and soft texture. It is however, very tasty and satisfying.
*Batter: The batter consistency is key. The batter should be thick, but should spread easily with a rubber spatula. It should look like a fudgy brownie batter, but very spreadable.
*Batter Thickness or rather thinness: Another key element is to spread the batter very very thin. The batter will not rise much, but since the batter is consisting of crushed quinoa you want the batter thin so it bakes thoroughly. If it is too thick, then your quinoa bread will be gummy.
*Baking Time: If you like your quinoa bread super crispy, follow the instructions on baking times. It is very important that you set and USE a timer for both the 1st side and flip side of the baking. Otherwise, you could end up with a gummy flatbread.
*Oven Preheat to 425 degrees F: It is very important that your oven is fully preheated before you begin the baking process.
*11-inch circle guide: The 11-inch circle guide works really well because it lets you know just how thin the batter should be when spreading it out.
*Flip side baking: After the 1st 15 minutes of baking, remove the baking sheet from the oven, use a long thin edged spatula and gently loosen the quinoa flatbread around all the edges. The baked bread will want to stick to the parchment paper, but trust me it comes loose with just a few tugs, then slide your spatula underneath the center of the flatbread, once it is fully loose, very carefully flip it over using tongs (be careful not to tear the flatbread.) It should flip over easily, then return the flatbread to the oven and do the flip-side baking. Be careful, it’s HOT!
*High Speed Blender: We use a Ninja High Speed Blender with great results. The key is that the quinoa must be broken down into a batter consistency. We used the “Auto IQ Ultra Blend” setting on our Ninja. Our regular food processor did not have the power to break down the quinoa.
#8: Italian Quinoa Flatbread
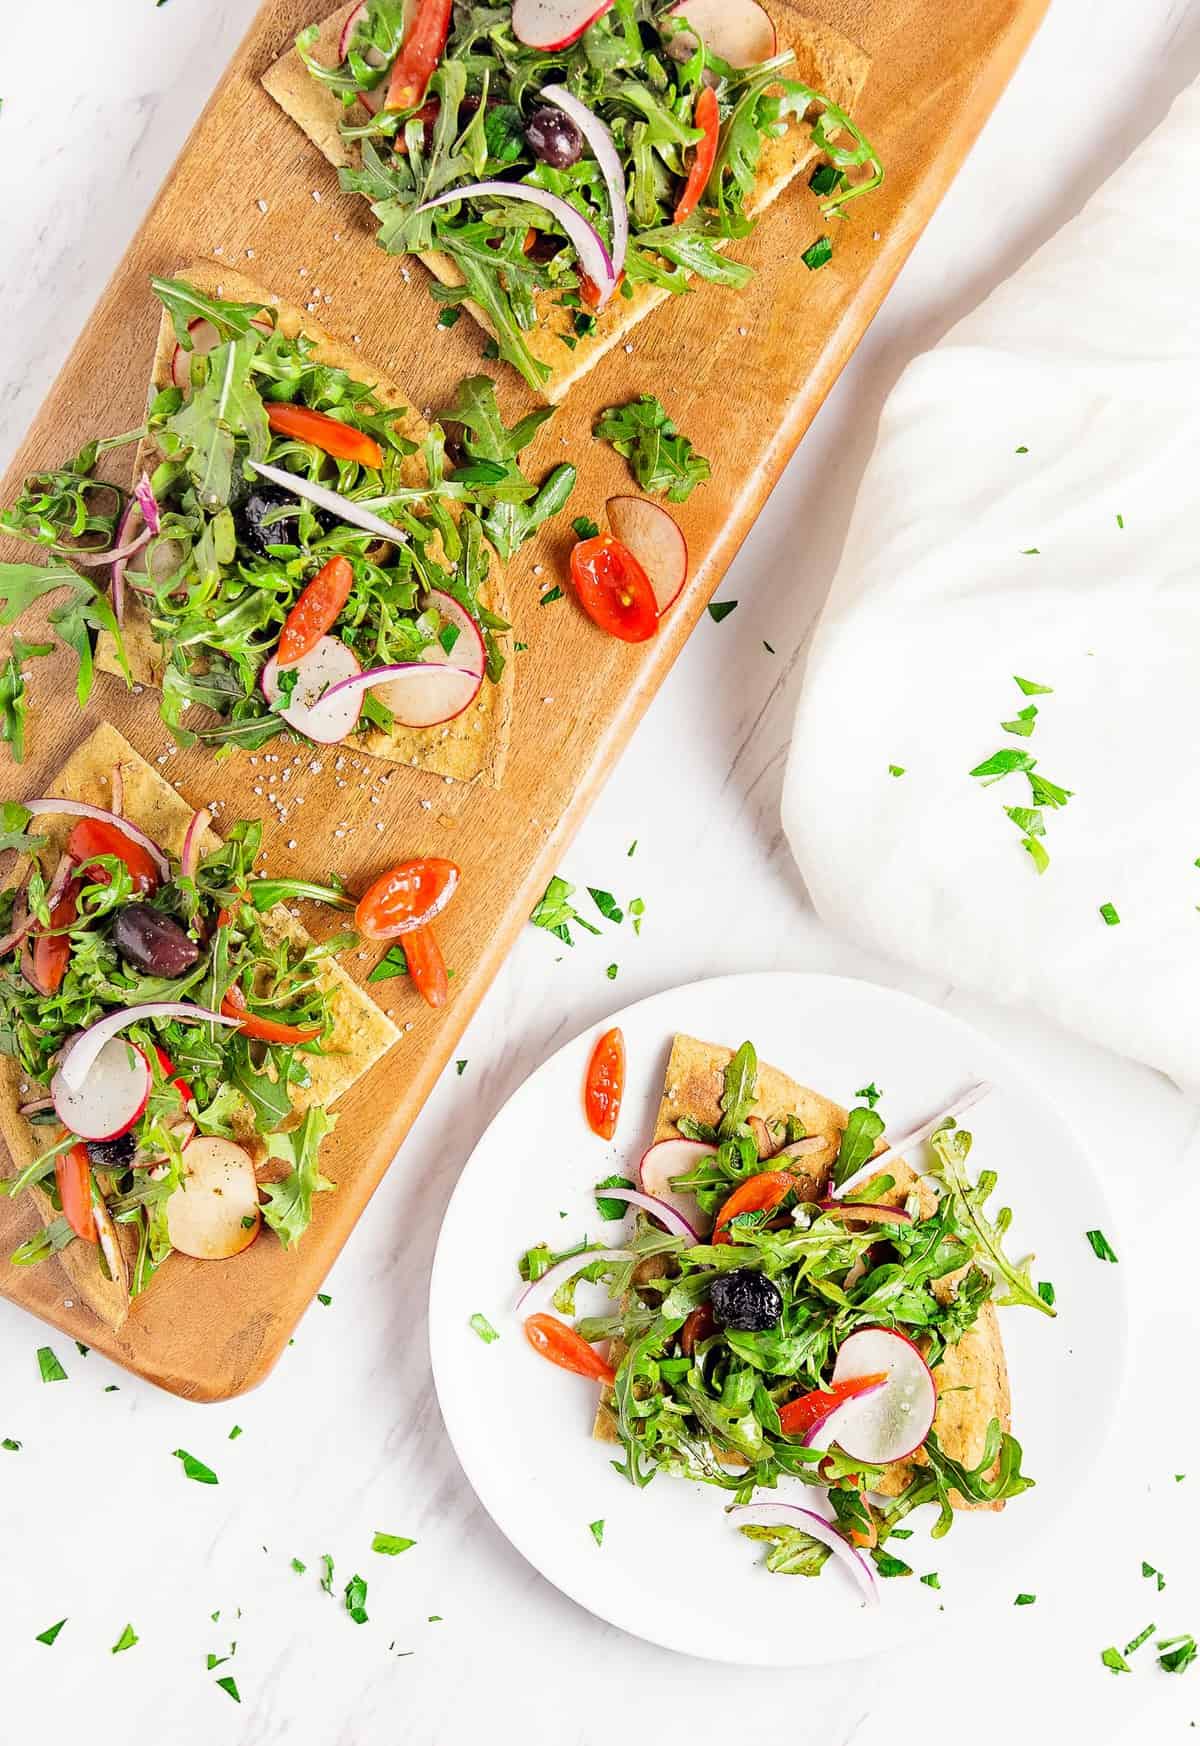
Robin here! We love arugula salads, and we make them all the time. For this flatbread, we topped it with a simple arugula salad consisting of arugula greens, tomatoes, red onions, slivered radishes, olives, and a splash of balsamic vinegar. Delish!
Print
Italian Quinoa Flatbread
- Prep Time: 7 minutes
- Cook Time: 21 minutes
- Total Time: 28 minutes
- Yield: 1 Flatbread 1x
Description
This amazingly simple and easy Quinoa Flatbread is healthy and sure to be a new family favorite. You just may never buy bread again after tasting these delicious flatbreads. It is versatile and oh so yummy! A fabulous Whole Food Plant Based recipe. Oil free, sugar free, no processed ingredients.
Ingredients
- 1 cup quinoa – uncooked
- ½ cup + 1 Tablespoon unsweetened plain plant milk
- 1 teaspoon baking powder
- ¾ teaspoon sea salt
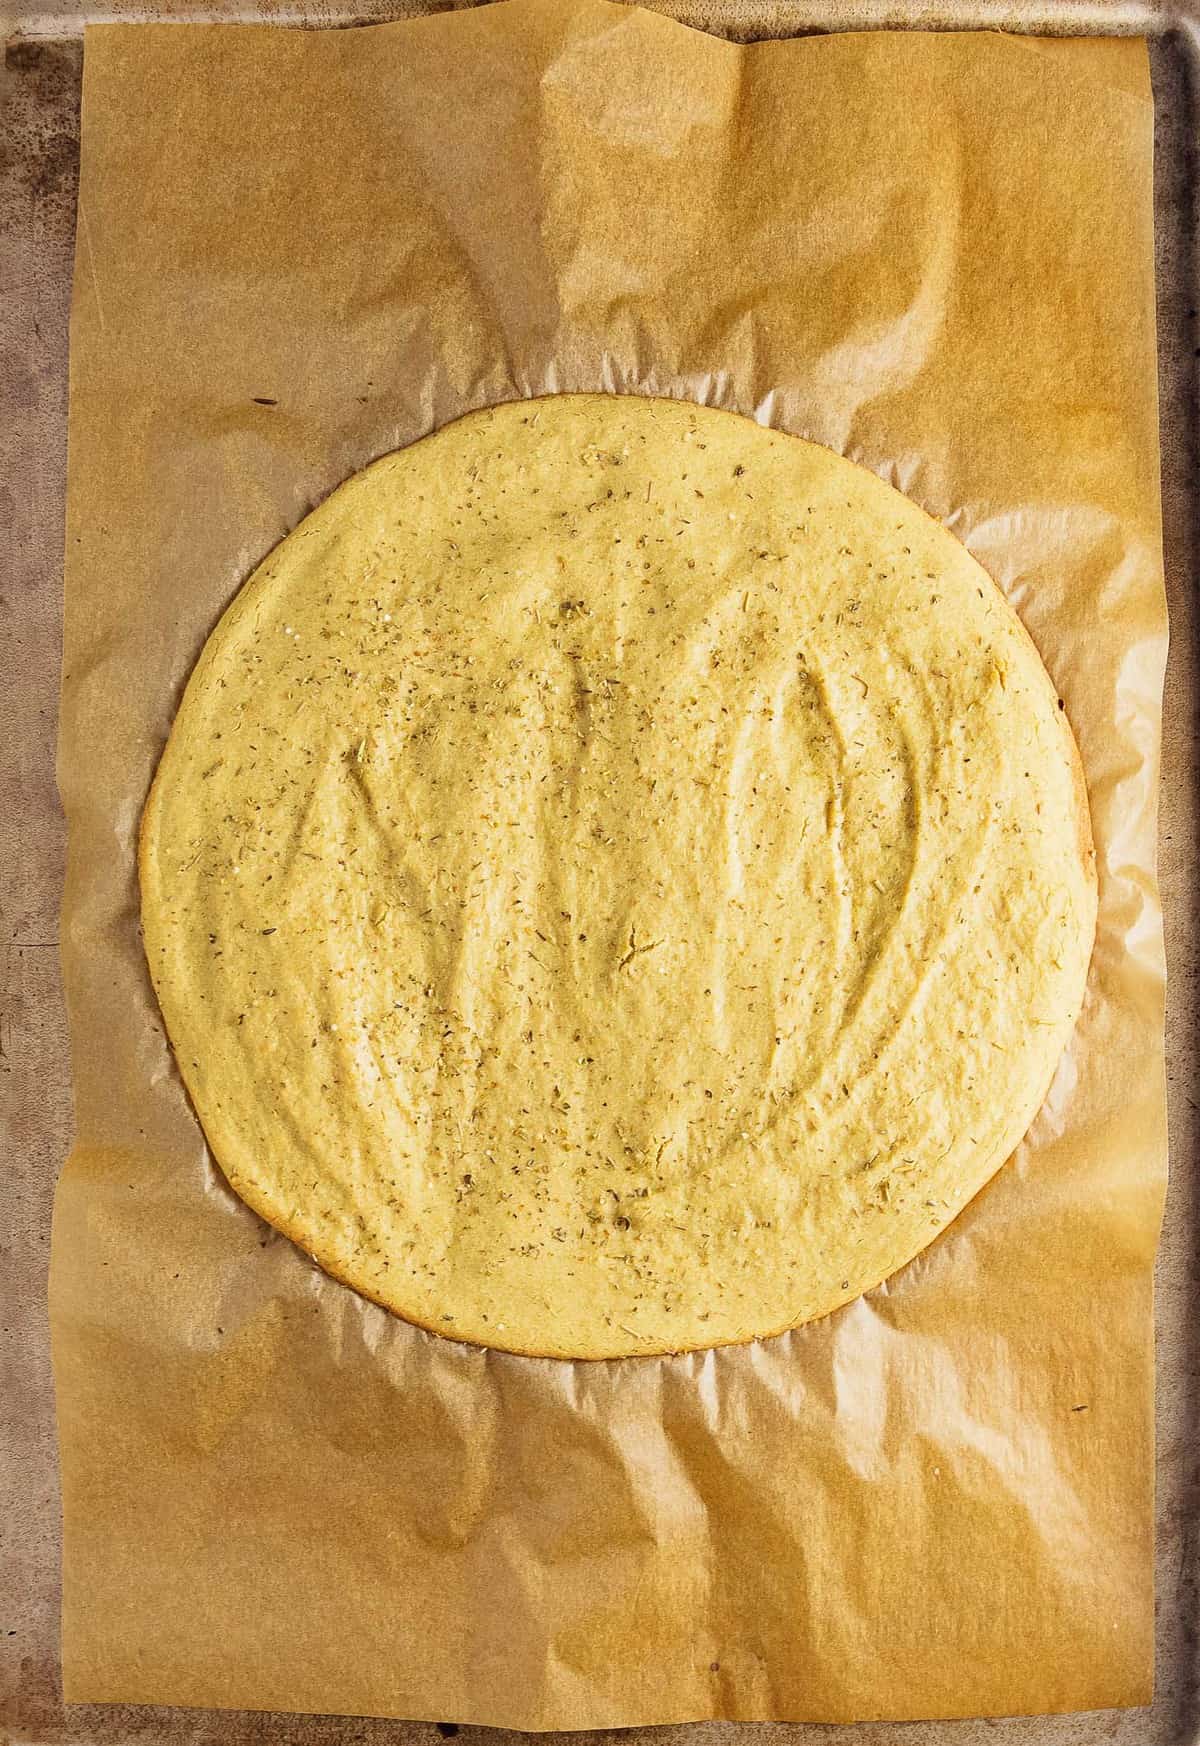
- 1 teaspoon Italian seasoning
- 1 teaspoon nutritional yeast
- Topping:
- Sprinkle a very small about of Italian seasoning on top (be careful, not too much or it can make it taste bitter)
Instructions
- Preheat the oven to 425 degrees F.
- Line a 14 x 20 baking sheet with parchment paper (or silicone baking mat). Invert the parchment paper and trace an 11-inch diameter circle in the center of the parchment paper to use as a pouring guide. Flip the parchment paper over and place onto the baking sheet. You should be able to see the circle from the other side. Note: This step is not required, but it can be helpful for some.
- Place the dry quinoa in a fine mesh strainer and rinse the quinoa really well with running water for two minutes. This removes the bitterness from the quinoa. Shake to drain excess moisture.
- Add the rinsed quinoa, plant milk, baking powder, and sea salt into a high-speed blender and blend on high for one minute. When using our Vitamix, we use the tamper tool to help move the batter along until it was able to blend on its own. If you don’t help it along, then the batter doesn’t completely mix well and become smooth. The batter should be smooth without any visible quinoa remaining. With a Vitamix, it may take a little longer to completely blend the quinoa, about 2 minutes. Reference the photos to review the consistency. Additionally, since this is a small amount of batter, use the smaller Vitamix container.
- The batter consistency is key here. Since quinoa has slight variations of “dryness” depending on how old it is, you need to pay attention to the thickness of the batter. The batter should be somewhat thick, and pourable with the help of a rubber spatula to get it onto the parchment lined baking sheet. If the batter appears overly thick, then add a teaspoon (+) of plant milk to loosen it up.
- Drop the batter into the center of the circle that you drew on the parchment paper. Once you get pretty much get ALL the batter out of the high-speed blender, take a rubber spatula and start to spread it out. Working from the center, gently pushing the batter outwards until you reach the outline of the circle. The batter should be spread thin. Reference the photos on the blog post for reference.
- Sprinkle a very small about of Italian seasoning on top (be careful, not too much or it can make it taste bitter)
- Place the quinoa flatbread into the oven and bake for 15 minutes.
- After 15 minutes, remove the quinoa flatbread from the oven, then using a thin edged spatula, gently loosen the bread from the parchment paper, flip over, and then return to the oven for another 4 to 5 minutes for chewy. Bake 6 to 7 minutes for crispy, 6 minutes for crispy, 7 minutes for crispy and crunchy.
- Enjoy!
- See additional recipe variations.
Notes
*Quinoa Flatbread: This is not your typical soft flatbread. It is made from quinoa and is not soft and fluffy because it has no oil which typically gives a more fluffy and soft texture. It is however, very tasty and satisfying.
*Batter: The batter consistency is key. The batter should be thick, but should spread easily with a rubber spatula. It should look like a fudgy brownie batter, but very spreadable.
*Batter Thickness or rather thinness: Another key element is to spread the batter very very thin. The batter will not rise much, but since the batter is consisting of crushed quinoa you want the batter thin so it bakes thoroughly. If it is too thick, then your quinoa bread will be gummy.
*Baking Time: If you like your quinoa bread super crispy, follow the instructions on baking times. It is very important that you set and USE a timer for both the 1st side and flip side of the baking. Otherwise, you could end up with a gummy flatbread.
*Oven Preheat to 425 degrees F: It is very important that your oven is fully preheated before you begin the baking process.
*11-inch circle guide: The 11-inch circle guide works really well because it lets you know just how thin the batter should be when spreading it out.
*Flip side baking: After the 1st 15 minutes of baking, remove the baking sheet from the oven, use a long thin edged spatula and gently loosen the quinoa flatbread around all the edges. The baked bread will want to stick to the parchment paper, but trust me it comes loose with just a few tugs, then slide your spatula underneath the center of the flatbread, once it is fully loose, very carefully flip it over using tongs (be careful not to tear the flatbread.) It should flip over easily, then return the flatbread to the oven and do the flip-side baking. Be careful, it’s HOT!
*High Speed Blender: We use a Ninja High Speed Blender with great results. The key is that the quinoa must be broken down into a batter consistency. We used the “Auto IQ Ultra Blend” setting on our Ninja. Our regular food processor did not have the power to break down the quinoa.
Storage: Place in a storage bag or container and use within 3 days. Freezes well.
More Delicious Recipes:
- Mini Mediterranean Quinoa Flatbreads
- Quinoa Flatbread Bagels
- Roasted Veggies with Red Pepper Sauce Pizza
- Vegan Greek Chickpea Salad Flatbread
This post contains affiliate links, and I may receive a very small commission if you purchase through those links at no additional cost to you. Thank you for supporting Monkey and Me Kitchen Adventures! For more information, see our disclosures here.


I’m impressed with all the varieties you came up with. I can’t wait to try them!! I’m curious of the yield. Each recipe makes only 1 flatbread. Am I ready this correctly?
Hi Cheryl! Thank you so much for your lovely comment and your question! Yes, each recipe yields one 11inch Quinoa Flatbread. We hope you love it as much as we do!
-Ameera and Robin 🙂
I just made this and it is fabulous. I wish that the website would’ve been a little bit easier to read, like listing the original flat bread recipe at the top and the variations below it instead of all of the variations right In a row before getting to the actual cooking instructions, but once I figured it out, it was a breeze. I made the regular one with some tricolor quinoa -and my blender seemed not to be as heavy duty as I was hoping – so I ended up adding a little bit of liquid from leftover chickpeas… Read more »
Hey Margaret 🙂
Yay! We are SO excited to hear that you enjoyed our quinoa flatbread! Great idea with the chickpea liquid 😉 We appreciate your feedback for the recipe layout, and we’ll see how we can adjust it for easier reading! Thank you so much again for the great feedback! We really appreciate it <3
-Ameera and Robin 🙂
So ….haven’t tried this yet but I bought 5lbs of quinoa so I will….. Just thought cinnamon bun flavouring would be awesome!!
Hi Lea 🙂
Yay, we’re so excited that you’ll be trying our quinoa recipe! 5lbs of quinoa – Woo Hoo! We haven’t tried cinnamon bun flavoring, but we did test a cinnamon/maple sugar variation, but it wasn’t quite working for us. We really hope the cinnamon bun flavoring knocks it outta the park. You’ll have to let us know how it turned out for you! <3
-Ameera and Robin 🙂
I have made these with a mixture of cinnamon and coconut sugar that we keep in a salt shaker. It is delicious, as are all of your recipes! Thank you!
This recipe is amazing! It is everything I have been looking for – gluten free, vegan, easy, tastes like bread, can be used as pizza base, or a wrap…my dreams have come true!! Thank you!
Hi there Jen! 🙂 We are so happy to hear that! YAY!!! We love how versatile this recipe is too; we always have a batch in the oven. Thank you so much, we truly appreciate you taking the time to let us know that you enjoyed this recipe! <3
-Ameera and Robin 🙂
Can you use quinoa flour for this recipe and not whole quinoa ?
Hi there Sherri,
We’ve never tried it with quinoa flour before. Not sure how it would turn out, but you could totally experiment. You won’t need to the blender, just stir in the baking powder and sea salt, and slowly add in the plant milk until you reach a brownie batter (thick paste) consistency. If you try it, let us know how it went.
-Ameera and Robin 🙂
Could you use it as a pizza base?
Hi Bren 🙂
Yes, you could use it as a pizza base. We would suggest following the directions as instructed, but when you go to flip over the flatbread, you could add your sauce and toppings then place it back into the oven to finish the last couple of minutes making sure the toppings get warmed through. We hope that helps. <3
-Ameera and Robin 🙂
Thanks 🙂
You are very welcome! 🙂 <3
So excited to try this recipe-I am making my first rejuvelac using quinoa instead of wheat berries, because I already had it in my pantry! I have two questions for you 1) did you try sprouting the quinoa before making your recipe and if not do you think it would work? And make the quinoa easier to break down in the blender 2) does quinoa actually age making it unusable for this recipe? Or does it just require more water? Seems everything has an expiration date these days!
Hi there Sherri 🙂
We have not sprouted quinoa before, so we aren’t sure what the texture would be like. We have heard of people soaking the quinoa overnight to help soften the quinoa. We have a Ninja Blender, which is very powerful and breaks down the quinoa so we don’t need to soak it overnight. As far as an expiration date, the quinoa bag should have one. However, we do find some batches need more water than others. We hope this helps. <3
-Ameera and Robin 🙂
have you ever tried this with brown rice?
Hi Lana,
No, we have not tried brown rice for this recipe.
-Ameera and Robin 🙂
hi! this question may sound silly haha but I didnt understand if you cook the quinoa or not? should I just rinse it and then blend it?
Hi there Alejandra 🙂
Not a silly question at all. It is uncooked quinoa that is rinsed and then blended with the other ingredients.
-Ameera and Robin 🙂
Will this work with store-bought quinoa flour instead of ground quinoa and would you have to adjust any measurements? Also what difference does it make between a plant based milk, dairy milk, and water?
Hi there Bob 🙂
Unfortunately, we don’t think that the quinoa flour will work for this particular recipe as the quinoa creates a brownie batter type consistency with a little texture from the blended whole dry uncooked quinoa. Additionally, we are whole food plant based so that is why we use the plant milk. We have received feedback from readers that water works equally as well; however we have not tried it. Hope you enjoy this recipe as much as we do!
-Ameera and Robin 🙂
Could you make them smaller than 11’? I make red lentil tortillas and get a dozen out of the recipe.
Hi there Becky 🙂
This recipe makes one large 11inch diameter flatbread. You can definitely make smaller flatbreads. The amount you can make is determined by the diameter. The smaller the flatbreads the more you can make.
-Ameera and Robin 🙂
Too much of a pain in the neck going up and down the page to see the recipe. I left before using it.
Hi there Lynn,
We really appreciate the feed back, and took it to heart! We took another look and felt that we had an opportunity to improve the recipe structure. We’ve updated it so that each flatbread has it’s own recipe in an attempt to make the process easier. We hope that this helps, and you give this recipe a try <3
Thank you so much!
-Ameera and Robin 🙂
Of note, I didn’t find the page setup cumbersome and actually appreciated the recipes cascading down without having to open separate recipes.
Hi there Theresa 🙂
Yay! We are so glad to hear that! We appreciate you sharing your wonderful feedback with us and for taking the time to write.
-Ameera and Robin 🙂
These look interesting but i’m wondering why you didn’t just get quinoa flour or quinoa flakes to work with instead of grinding whole quinoa? Is there some reason not to use these that makes it different?
Hey there 🙂
We use the whole quinoa because when it is blended it gives the flatbread batter texture. Quinoa flour or flakes would make the batter too thick and would create a more pancake like bread instead of a chewy/crunchy flatbread. Hope this helps!
-Ameera and Robin 🙂
I used quinoa flour because that’s `s all i had. I used 3/4 cup of quinoa flour and 5/8 cup of almond milk. These came out great and it didn’t stick to the paper.
Hi there Celena 🙂
Thank you so much for sharing <3
-Ameera and Robin 🙂
I”m wondering if the type/age of quinoa makes a difference. I followed recipe to the letter, got a nice batter, spend on 11″ circle on parchment, baked exact time with timer, flipped, timed – and the flatbread was quite soft. Back in the oven a few minutes at a time. After another 19 minutes on the 2nd side, I gave up and ate what resulted. I am just baffled why it took so long to get a chewy, still not crisp, flatbread. I had made half plain, half with garlic and onion powder and a bit of Italian seasoning sprinkled… Read more »
Hey there Candice 🙂 Hmmm, we aren’t sure what happened. Our style Quinoa Flatbread reminds us of a denser naan bread with a little bit “chewier” texture. Our recipe is definitely more bread-like than crispy cracker texture. However, when you leave it in a minute or two longer it does give it a more “crunchier” texture. You will see certain parts a little darker/browner and crunchier, but the whole Flatbread isn’t going to be crunchy like a cracker (like Mary’s Gone Crackers style.) We hope this helps clarify the type of flatbread texture it should have. Other than that, it… Read more »
Thank you! That helps to know it is more Naan-like, makes sense now. I was thinking it was supposed to be crispy like crackers/chips! So I’ll try again, and definitely won’t need to bake as long!! I can do Naan!!! That’s basically what it was like at the end of the cooking time in recipe, I just thought it was supposed to be different! So this is OK, no problems! And it did taste good!! Thanks for sharing a fun recipe – my learning curve finally caught up!
Hey Candice 🙂
Sure, we completely understand, and happy to help anyway we can! We’re so glad that you enjoyed the flavor <3
-Ameera and Robin 🙂
Hi there. Great recipe. I was having trouble getting it off my parchment paper so tried it on my silicon baking sheet. Came off easily. Now to get better at spreading it evenly.
Hi there Donna 🙂
Glad you are enjoying our Quinoa Flatbread recipe. We make this recipe a couple times a week, and we haven’t had it stick before. Perhaps the batter isn’t spread thin enough, and when you are ready to flip it sticks. We are glad that the silicon baking sheet worked for you.
Happy baking <3
-Ameera and Robin 🙂
Mine stuck too. Silicone is a good idea.
Just made this and excited to try it. If it goes well maybe my gluten free daughter will enjoy it to! She loves to cook and bake!
Hi there Amanda 🙂
Yay, so excited you are trying our Quinoa Flatbread. We absolutely love it and use it regularly. We hope you and your daughter enjoy it. Love that she is so passionate about cooking and baking too! <3
-Ameera and Robin 🙂
Made it today – The red chili one xcept toned down the heat. Was really very good. Made it for my sister who is celiac. She loved it. Thx much
Hi there Darlene 🙂
Awesome! So glad that you and your sister enjoyed this recipe. We appreciate you taking the time to write and your wonderful feedback! Thank you so much <3
-Ameera and Robin 🙂
Is there a way to print these recipes in a suitable format other than just hitting Ctrl P? I don’t see a print button option. I would love to print a copy of some of these.
Hi there Cass 🙂
There are 8 Quinoa Flatbread variations, and each one has its own recipe card. Scroll to the variation you would like to print and in the recipe card right underneath the picture is a “print” button. It will print the corresponding recipe. Hope this helps. Please let us know if you have any other questions.
-Ameera and Robin 🙂
thank you!
It’s our pleasure! Thank you for giving this recipe a try <3
I just made the italian variation and loved it. I see tons of FRESH, HOMEMADE quinoa flatbread in my future. I hadn’t made anything to go with it since I was just testing out the recipe. It was a little naked by itself so i grabbed an avocado and used that for a topping. Such a yummy, healthy snack! I’m sold!!! Thank you so much for all your hard work to make simple recipes for the masses. 🙂
Hi there Pamela 🙂
Yaaayy! So thrilled you tried our Italian Quinoa Flatbread and enjoyed it! Adding avocado is definitely a delicious topper! We make this recipe regularly throughout the week. Perfect for snacks, pizza crust, soup dippers, the possibilities are endless. We truly appreciate you taking the time to write and thank you for your wonderful feedback!
-Ameera and Robin 🙂
I just excitedly tried this recipe and it turned out great. The disappointment was I had left it in the oven the allotted time of 15 mins to find it fully cooked and stuck to the parchment paper. I couldn’t peel it off. Had to sort of split the flat bread in 2 just because I desperately wanted to taste it. What I got to taste was great and just what I wanted. Unfortunately most of it was attached to the paper and inedible. Do you suggest lowering the cooking time or simply greasing the non stick sheet pan and… Read more »
Hi there Rosy 🙂 Thank you so much for reaching out to us! We are glad that you gave this recipe a try, but so sorry to hear that the flatbread stuck to the parchment paper. We believe it is the parchment paper that you used. We have personally made this recipe a TON of times (a couple times a week.) We do notice that parchment paper plays a role in the stickiness. We’ve had one reader tell us that her parchment paper also had a “stick” issue, however, it wasn’t so sticky that she couldn’t peel it off to… Read more »
Mine stuck too. It could be the brand of parchment paper actually. I usually have nice stuff but I tried a deal from the Dollar store and it’s not as nice.
looking forward to trying this, i was wondering what made you choose to do it with dry quinoa? it seams like a lot just asking completely out of curiosity.
Hi there Melissa 🙂
Thank you for thinking about giving this recipe a try. As mentioned in the post, we talk about how WFPBers in the facebook groups we belong to were talking about making flatbreads from dried quinoa, and we decided to create our own variation. We hope you enjoy this recipe as much as we do!
-Ameera and Robin 🙂
Where have you two been all my life? These look fabulous, thank you!
Hi there Jane 🙂
Awe, you are too sweet. Thank you so much for your kind words! We truly appreciate your support. Hope you enjoy these flatbreads as much as we do.
-Ameera and Robin 🙂
Has anyone tried freezing these please?
Hi there Karen 🙂
We haven’t tried freezing them. If you try, you may want to put them in the oven for a quick crisp-up.
-Ameera and Robin 🙂
Came across the recipe on FB. Thank you so much! This is just what I needed to satisfy the “bread” I’ve been missing, while trying to cut back on the gluten.
Hi there Brandy 🙂
Awesome, so glad this recipe is what you’ve been looking for! We hope you enjoy it as much as we do. Thank you so much for taking the time to write!
-Ameera and Robin 🙂
hi! I made these with cooked quinoa and spread them thin..they were hard to remove from the parchment paper, I mistakenly turned off oven and left a couple on the baking sheet last nite…and guess what??!! I had delicious crackers this morning!
Hi there Val 🙂
We’ve never tried this dish with cooked quinoa, not sure if that contributed to the difficulty in removing the parchment. Uh oh, it’s rough when mistakes happen, but it’s always nice when it turns out into something new and delicious. Glad you enjoyed these flatbread as crackers.
-Ameera and Robin 🙂
Wooow!!!! Ok listen!! I just made these, in my handblender, in a dry frying pan, just 2,5 minutes each side….. and wooooow!!! Soooo yummie!!!!
I added garlic powder, turmeric, black pepper and Italian herbs….
The texture is great! The batter didn’t get as smooth as in a highspeed blender of course, but smooth enough. No lumbs or crumbs….. just soooooo tasty!!!!!
Thank you for these great recipes!!!!
Hi there Tilly 🙂
Yaaayyy!!! So glad that you gave these flatbreads a try! We totally have to try it in a pan – very cool! And the added seasoning – YUM! Thank you so much for your awesome feedback and taking the time to write!
-Ameera and Robin 🙂
I had wondered about that. If it were thinner it could work. I added finelyvchopper sun dried tomato, fresh chopped oregano and Parmesan to my batter and it was very tasty.
This is what I was looking for! Thanks. Do not want to heat my kitchen up.
Just made the cornmeal version tonight to go with black bean soup. Excellent and so easy! This is third recipe I have tried from your site and so far all super yummy! Thank you for all of your hard work coming up with these recipes. I have been eating WFPBNO for close to a year and your site has become my go-to for ease of use of confidence that it will come out the way you describe.
Hi there Tina 🙂
Yaaayyyy!!! We are so thrilled you gave our Cornmeal Quinoa Flatbreads a try and enjoyed them. We are SUPER excited that you’ve been enjoying the recipes you’ve tried from our blog. Glad to be on this WFPBNO journey with you! We truly appreciate you and your support! Thank you so much!
-Ameera and Robin 🙂
Any chance of you making another flatbread recipe that is gluten free, oil free etc. but NOT quinoa??? I’m allergic to quinoa (waaaaah!) and I have Celiac disease. Thank you so much! I just stumbled across your site today and am pinning EVERYTHING, lol!
Hi there Tanya 🙂
Thank you so much for reaching out to us! We are so thrilled that you found us and have been pinning our recipes. We hope you gave some a try and enjoy them. We are so sorry to hear this recipe won’t work for you with your allergy. We can definitely play around with some possibilities in the future! Thank you so much!
-Ameera and Robin 🙂
What about amaranth? I was just wondering. It is like the quinoa cousin, right?
Hi there Julie 🙂
We are not sure how well amaranth would work in this recipe.
-Ameera and Robin 🙂
Hi, I wonder if I could triple the recipe and make them back to back or if the batter sitting in the blender waiting to be baked would change the consistency?
Hi there Karen 🙂
Thank you so much for reaching out to us! That’s a great question; we haven’t tried it before. You could definitely give it a try. Our only concern would be that as the batter sits it could get thicker and thicker. It’s possible you may need to add a teaspoon/tablespoon of plant milk to thin out again or it may not be a problem at all (as we haven’t officially tried it.) If you give it a try, we’d love to hear how it went.
-Ameera and Robin 🙂
I did this and the batter did get very thick. I just added water and the net one came out just as good.
hi there again from Australia.. just made these for the first time after reading comments on sticking i thought i might add my comment and a trick… i use a pizza tray aluminium and baking paper yes it was a bit sticky so all i did was flip the paper over onto the tray and the baking paper pulled away very easily.. hey presto its on the right side to continue baking…
Hi there Christina 🙂
Woot! Love this trick – such a great idea! Thank you so much for sharing!
-Ameera and Robin 🙂
Where did you find a mesh strainer fine enough so the quinoa won’t fall through? Mine doesn’t work. Also, doesn’t quinoa usually come already washed now?
Hi there Donna 🙂
Thank you so much for reaching out to us. We use a fine mesh metal strainer by OXO and have not had a problem with quinoa falling through.
-Ameera and Robin 🙂
Do you really have to wash it?
Yes, you need to rinse your quinoa under cold water in a fine mesh strainer. This will help remove a bitter film that coats the quinoa.
-Ameera and Robin 🙂
Can I use Quinoa flour ?
Hi there Hailey 🙂
Thank you so much for reaching out to us. We do not recommend quinoa flour for this recipe.
-Ameera and Robin 🙂
Hi I do not have a high powered blended but I do have a coffee grinder we use for spices…do you think it will work if I grind the quinoa once it’s dried then transfer it to the blender I have?
Hi there Devin 🙂
Thank you so much for reaching out to us. Unfortunately, this recipe needs a high-speed blender and made according to the instructions.
-Ameera and Robin 🙂
I also don’t have a high-speed blender. I rinsed the quinoi, spread it out and let it dry (low oven for 1 hour), then used my spice grinder. I needed more liquid than the recipe called for. I’m not sure I got the correct texture (as described) but I got a crunchy sort of crispy product that I enjoyed. I tried this again without rinsing the quinoi (waiting for quinoi to dry is not conducive to cravings!), and again, I needed more liquid (almost a full cup of plant milk), but got crispy rounds that I am enjoying right now.… Read more »
What setting did you use on the Vitamix full power? My batter came out much thicker, so I’m trying to troubleshoot. I only have the tall container, so maybe tamping down wasn’t doing enough. Do I just add more “milk” to fix the consistency?
I ended up just trying it anyway. It was really hard to spread, and I gave up and cooked it thicker than it should be, but it still turned out decent, I liked the flavor and texture. But I want to try again and get it perfect.
Hi there Terri 🙂 We sincerely apologize for the late response as Monkey has been on maternity leave and we are now just being able to address comments – thank you for your patience. We appreciate you reaching out to us. Did you rinse your quinoa? We find that rinsing the quinoa adds the little extra moisture/water needed to create the perfect batter consistency. You can always add more milk to get a smoother consistency. Additionally, we use a 32oz container to make this recipe on the highest setting with the tamper tool to help keep the batter moving. -Ameera… Read more »
I’ve made this recipe many times and it is so good. It’s made being gluten-free a lot easier! My only suggestion is that it always needs more liquid than the recipe. I have a Vitamix and even with the tamper it doesn’t blend with only 1/2 cup liquid to 1 cup quinoa. I find the batter is the right consistency and will blend with at least 3/4 cup liquid. Thank you for all the variations too! They are very inspiring.
Hi there Dawn 🙂 Yaaaay!!! We are so thrilled to hear that you are enjoying this recipe and have been making it often. We use the smaller vitamix container (32oz) and rinsing the quinoa creates more moisture, perhaps this is why we don’t need the extra liquid. But adding the extra liquid to create a good consistency is key, and depending on the brand and age of the quinoa it could change the liquid amounts needed. But glad that you’ve adjusted and enjoyed this recipe. We appreciate you sharing your awesome feedback and for taking the time to write. -Ameera… Read more »
Hi guys! I love your page & have never been disappointed with any recipe I have tried. Thanks for putting so much time & love into the recipes. Just one question: What is in the Italian seasoning? I’m German, and all we get here are Italian herb mixes, but it does not sound or look like that’s what you’re using. So which spices would I combine to recreate Italian seasoning? Thank you very much in advance! Oh, and I’m totally trying this today!
Hi there Margaret 🙂
Thank you so much for reaching out to us. Italian Seasoning is simply and Italian Herb Mix. It is very common in most grocery stores in the USA.
-Ameera and Robin 🙂
Thank you for replying. I feel a little stupid now. So it’s what I already know – and just as common here. Getting started on the Italian version right now! 😊
Hi there Margaret,
Sorry for the late response. We appreciate YOU!
Thank you.
-Ameera and Robin
Hi I’m a newby and wonder if you have nutritional break down for this recipe. It looks soooooooo good, but with my many health challenges I need to be careful. Thanks.
Hi there Melody 🙂
Thank you so much for reaching out to us. Our earlier recipes do not have the nutritional breakdowns. We started including them in late 2019 and on. You can calculate the nutritional information using cronometer, Thank you again.
-Ameera and Robin 🙂
Thank you for these recipes! Can I use any colour quinoa? I used the black quinoa, soaked it over night, but it still didnt break up so well… Or is that just because of my machine?
Hi there Nicole 🙂
Typically any dried quinoa will work well with this recipe after rinsing well. You really need a high-speed blender for this recipe. I hope this helps.
Thank you.
-Ameera and Robin
I just came across this recipe and had to say thank you! I very successfully made the cheezy garlic version in a 12” skillet (about 3-4 min per side on med low with a lid on) and it was so good!! A perfect side to eat with your lentil stew recipe. Can’t wait to try the other variations now!
Hi there Samantha 🙂
Well Yaaaayyy! We are so thrilled that you enjoyed this recipe. Love how you baked it. We will have to give that a try! Thank you so much for sharing your awesome review with us. We appreciate you taking the time to write.
-Ameera and Robin 🙂
Girls, slam dunk! Wonderful recipe. I tried out the spicy version because I too have been missing crunchy chips. They totally hit the spot in every way. Thank you for your efforts in putting this recipe together. I plan on trying out each and every variation.
Hi there Regina,
WOOOO HOOOOO!!!! We are so happy that you gave this recipe a try and enjoyed it. We love the spicy version too (Red Hots). We appreciate you taking time to write us an awesome review of this recipe! Thank you!!
-Ameera and Robin
This is so delicious! I wasn’t expecting it to be, probably because it made me think of lentil tortillas I made once & they were horrible. But I have loved every recipe I’ve made from your site. Which is probably close to a dozen. I sprinkled Trader Joe’s Ajika Georgian Seasoning Blend on the flatbread. I made this recipe a few days ago & I’m back here to make it again. I have some leftover hummus and I must have this quinoa flatbread to dip into it. 🙂
Hi there Laura,
WOOO HOOOO!!! We are so happy that you gave this recipe a try and enjoyed it! Thank you so much for the awesome review.
-Ameera and Robin
Haha…I just have to share that I have another recipe pulled up for split pea & potato soup. I just realized it’s your recipe. I got curious so I looked to see how many Monkey & Me recipes I have pinned on Pinterest. Over 20! Last week I made the pizza pasta supreme for a gal I am a private chef for, and this week I’m making her the cold Italian spaghetti. I’ve made your black bean burgers & stuffed bell peppers several times over the last 3 years. I guess I love many, many of your recipes so thank… Read more »
Hi there Laura,
We are thrilled that you are pinning our recipes, making them, and enjoying them. We sincerely appreciate you taking time to leave us an awesome review. Thank you so much.
-Ameera and Robin
Nutritional yeast in the Italian version: sprinkle on top, or mix with the batter? I’ve looked through the comments and couldn’t spot this question in there. Looking forward to making these!
Hi there Lee,
Thank you for your question. Add the nutritional yeast into the batter.
-Ameera and Robin
Hi !
I scrolled.down the comments but didn’t see this asked.
I cannot have plant based milk, nor cow milk- do you think I.can try it with just water ?
Hi there Cecile,
Thank you for your question. Yes, you can substitute water for plant milk in this recipe.
-Ameera and Robin
This is a great recipe. I make the garlicky cheese quinoa flatbread quite often. It is chewy/crispy and the flavor is fantastic. My GF friends, especially, love the taste and texture and can’t believe it’s vegan. Quinoa flatbread is a keeper!
Hi there Maria,
YAYYYY!!! We are thrilled that you enjoy the garlicky cheese quinoa flatbread. Thank you so much for taking time to leave us a great review.
-Ameera and Robin
Hi! I just found this recipe and made my first quinoa flatbread and it is amazing! Quick question…how do you store these flatbreads? Thank you.
Hi there Darlene,
YAYYYYY!!! We are thrilled that you enjoyed this quinoa flatbread. You can store them in a plastic storage box or bag. To crisp them up, you can place them back in the oven for several minutes in a 425 F oven.
Thank you.
-Ameera and Robin
I’m using a fan forced oven and 240C is too high, it was burnt on the edges after 15 mins
Hi there Tracy,
So sorry that this recipe did not work out for you. Your 240 C temperature was indeed too high. We used 425 F which is roughly 215 C. We are not sure why you used 240 C.
-Ameera and Robin
Hi. If I am using a convection oven, should the temperature and/or cooking time be less, or should I shut off the convection?
Hi there Dina,
Thank you for your question. We suggestion shutting off the convection that is what we do with our oven when making these.
-Ameera and Robin