Description
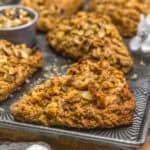
Light and fluffy, these Vegan Maple Glazed Banana Nut Scones are everything you crave in a cozy morning treat.
Ingredients
Scale
Dry Ingredients:
- 2 ½ cups (11.6 oz.) unbleached all-purpose white flour *
- ½ cup coconut sugar (or other dry sugar like date or maple) *
- 1 ½ teaspoons cinnamon *
- Pinch nutmeg
- 1 Tablespoon baking powder
- ¼ teaspoon baking soda
- ½ teaspoon sea salt
Wet Ingredients:
- 1 cup thoroughly mashed bananas *
- 2 Tablespoons unsweetened almond butter *
- ¼ cup unsweetened plain plant milk
- 1 teaspoon vanilla
- 1 Tablespoon lemon juice
Glaze Topping Ingredients:
- 2 Tablespoons pure maple syrup
- 2 teaspoons water
Nut Topping Ingredients:
- 2 Tablespoons pure maple syrup
- 1 teaspoon water
- ¾ to 1 cup chopped walnuts
Instructions
- Line an 8-inch round cake pan with parchment paper (bottom only), dust the parchment paper with some flour, set aside.
- Line a large (15 x 21 or similarly large) baking sheet with parchment paper or silicone pad, set aside.
- Thoroughly mash several spotted bananas, measure 1 cup of mashed bananas, set aside.
- Place the all the Dry Ingredients into a large mixing bowl, whisk to combine.
- Add all the Wet Ingredients (including the 1 cup of thoroughly mashed bananas) to the dry ingredients and mix well with a stiff spoon, then continue mixing by hand to incorporate all the ingredients. At first it will appear that the dough is too dry, keep mixing by using your hands until the dough comes together.
- The dough should feel slightly firm, but still somewhat flimsy and slightly sticky. Form a ball of dough inside the bowl. Dust the top of the dough with some flour, then gently dump the ball of dough into the parchment paper-lined 8-inch cake. Sprinkle with some additional flour (if needed). Press the dough disk down evenly to fill the 8-inch round cake pan, pushing the dough to the sides of the round cake pan. Cover with plastic wrap and place in the freezer for 15 to 20 minutes.
- Preheat the oven to 400 F, center rack.
- After 15 to 20 minutes, gently dump the slightly frozen dough out onto a very lightly floured surface, remove the parchment paper, then divide into 8 even triangles, by cutting the dough in half down the middle, then in half again, repeat until you have 8 equal triangular pieces. A small bench scraper works well for this job. In between every cut, wash the bench scraper and dry thoroughly if any dough sticks to the bench scraper. If you do not have a bench scraper, a large chef’s knife works well too.
- Place the dough triangles onto the parchment/silicone lined large baking sheet with the smaller part of the triangle facing inward. Shape the dough – see recipe notes.
- Place 2 Tablespoons of maple syrup and 2 teaspoons of water in a small bowl, whisk. Then brush the maple mixture all over the tops and sides of the dough scones.
- In another bowl, place 2 Tablespoons of maple syrup and 1 teaspoon of water, whisk to combine, then dump the chopped walnuts into the maple syrup mixture, mix well to endure all the chopped nuts are evenly coated, then strain off the maple syrup so all only the maple syrup coated walnuts are left in the bowl, then generously top the scones with the coated walnuts. Important Note: Be sure to drain off any excess maple syrup off the walnuts to prevent excess runoff of maple syrup.
- Place in a 400F preheated oven for 15 minutes. At the 15-minute mark, place a large sheet of loose foil (or parchment paper) over top of the scones to prevent the tops from burning.
- Place back in the oven, and bake for another 4 to 5 minutes or until a toothpick comes out clean.
- Remove the scones from the oven and allow the scones to cool on the baking sheet for 2 minutes, then move them to a cooling rack. Allow to cool for 10 to 20 minutes on the cooling rack, then enjoy! Store at room temperature in an air-tight container.
Notes
Please reference the blog post for Tips for Success, Pantry Items Used, Storage and Freezing, and Kitchen Products Used.
Sea Salt: Please adjust the sea salt based upon your family’s sea salt preferences and/or based upon dietary needs.
Servings: Makes 8 scones