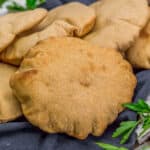
Description
Soft, tender, and delicious, this homemade Healthy Whole Grain Pita Bread recipe is total comfort and sure to satisfy.
Ingredients
Scale
- 4 cups white whole wheat flour (see notes) *
- 1 Tablespoon dry active yeast *
- ½ to 1 ½ teaspoons fine sea salt (+/-) *
- 1 ¾ cups + 2 Tablespoons warm water (120 to 130F degrees), divided
- 1 teaspoon pure maple syrup (optional) *
Instructions
- Place the flour, dry active yeast, and sea salt into a large mixing bowl. Whisk to combine.
- Add the 1 ¾ cups warm water and maple syrup and mix well with your hands until the dough starts to come together. While the dough is still in the bowl, start kneading the dough inside the mixing bowl to form a ball, then add 2 Tablespoons of warm water. At first the dough will seem too wet, but keep kneading, it will start to absorb the water, the stickiness will go away, and become easier to knead. Knead the dough for about 5 to 8 minutes, or until the dough is smooth and elastic. Form the dough into a ball while still inside the large mixing bowl. Cover with a tea towel (or plastic wrap) and let rest for 15 minutes (up to 30 minutes).
- After 15 minutes, remove the dough from the mixing bowl and place onto a very lightly floured surface and divide into half, then half again until you have 8, 10, or 12 pieces of dough (the number of pita breads is largely dependent on how big/small you want your pitas). Form each dough piece into a ball by pressing your thumbs into the dough and turning the dough inside out with your thumbs for 30 seconds, then forming a ball. Place the dough balls onto very lightly floured parchment paper-lined baking sheet. Cover the dough balls with a tea towel. Allow to rest for 30 minutes.
- On a very lightly floured surface, take each dough ball, roll it into a thin ¼ inch or thinner circle with a rolling pin. Use just the smallest amount of flour to prevent sticking. Then place the flattened dough onto very lightly floured parchment paper lined baking sheet(s). Keep all the dough covered with a tea towel. Continue until all the dough balls have been flattened into rounds. You can layer the flattened dough rounds on top of each other using very lightly floured parchment paper in between the layers. Cover all the flattened dough with tea towels to prevent skins from forming on the dough. Allow to rest (proof) for 15 minutes. Note: Do not stack the flattened doughs higher than 3 on top of each other. If you are stacking pitas and the dough appears that it could stick, flour both sides of the parchment paper or flour both sides of the pita to prevent sticking. Either way works.
- Preheat the oven to 500 F. You will use the lowest rack in the oven.
- Approximately 10 minutes before baking, place an empty baking sheet in the oven to heat up. Using a preheated hot baking sheet will help the dough puff up.
- Have a small bowl of tap water next to you while you work (or use a spray bottle). You may or may not need the tap water.
- When ready to begin baking the dough, carefully remove the hot empty baking sheet from the oven. Then take several of the dough rounds (or as many as can fit on the baking sheet) and flip them over onto its other side onto the hot baking sheet, then immediately place the hot baking sheet back into the oven, close the door. Turn the oven light on so you can view the pitas while baking. Set the timer for 5 minutes.
- After the pita dough has been in the oven for two minutes, and IF you are not seeing the pitas start to puff up, then dip your fingers into the bowl of tap water, shake off some of the water, then open the oven door very quickly and flick some of the water lingering on your fingers inside the oven, immediately shut the door. When the water hits the hot oven and baking sheet it will sizzle which is what you want, we are trying to create steam to cause the dough to puff up. You can also use a spray bottle to accomplish this, give it two very quick, light mists. See blog post for additional tips. If the pita dough is starting to pop after two minutes, then you can skip the water step.
- After 5 minutes, remove the pitas from the oven, remove them from the baking sheet, and cover them in a tea towel. Repeat the process until all the pita breads have been baked. See blog post for additional tips.
- When cooled, cut the pita in half and stuff with your favorite fixings.
Notes
*Please reference the blog post for Tips for Success, Pantry Items Used, Storage and Freezing, and Kitchen Products Used.
*Sea Salt: Please adjust the sea salt based upon your family’s sea salt preferences and/or based upon dietary needs.
*Servings: Makes 8, 10, or 12 pita breads (largely dependent upon how large you want the pitas)