Description
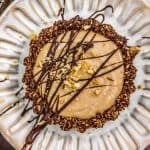
Outrageously delicious, completely decadent, our easy to make Vegan Peanut Butter Pie is perfect for holidays, special occasions, or simply any time! This old-fashioned peanut butter pie is seriously dream worthy. The chocolate oat crust is simple, yet perfectly complements the smooth and creamy peanut butter filling. Topped with a drizzle of melted chocolate and chopped peanuts makes for the perfect pièce de résistance. Your whole family will be singing your praises while enjoying this delightful, wholesome sweet treat.
Whole Food Plant Based, vegan, plant based, oil free, refined sugar free, gluten free, no highly processed ingredients.
Ingredients
Crust Ingredients:
- ½ cup rolled oats, coarsely chopped
- 1 Tablespoon unsweetened cocoa powder
- 1 Tablespoon + 1 teaspoon organic maple syrup
- 1 Tablespoon unsweetened peanut butter
- Pinch sea salt (+/- to taste) *
Filling Ingredients:
- 2 Tablespoons vegan cream cheese *
- 2 Tablespoons + 1 teaspoon unsweetened peanut butter
- 2 Tablespoon lite coconut milk, refrigerated
- 1 Tablespoon organic maple syrup
Topping Ingredients (Optional):
- 2 Tablespoons vegan chocolate chips, melted *
- 1 Tablespoon chopped peanuts
Instructions
Crust Instructions
- Place the rolled oats (not instant oats) into a food processor and coarsely chop by pulsing for about 15 seconds, then place into a bowl. Add all the remaining Crust Ingredients into the bowl and mix well until everything is combined. At first you will think it won’t come together, but it will.
- Divide the crust mixture into 2 amounts, then press one of the mixtures firmly into the bottom of small bowl, ramekin, small tart pan, or even a coffee mug will work. Repeat with the 2nd crust mixture. We used two 4-inch mini tart pans. Place in the freezer for 15 minutes while making the filling. If using a tart pan, place some of the filling in the center, press firmly, make sure you go up the sides to the edge with the crust mixture.
Filling Instructions:
- Place all the Filling Ingredients into a small bowl, mix until well combined. Note: You will need to whisk the filling really well. It will seem loose but keep whisking vigorously until it becomes creamy and very smooth. Taste test. If you want more peanut butter flavor, add an additional teaspoon of peanut butter. Place the bowl in the refrigerator. After the crust has been in the freezer for 15 minutes, then gently place and smooth the peanut butter filling on top of the 2 crusts. Freeze for 45 minutes or overnight.
Optional Topping Instructions:
- Place the vegan chocolate chips in the microwave for 10 seconds, then stir. Continue microwaving at 5 second intervals until the chocolate chips are completely melted. Then let the melted chocolate slightly cool for 10 minutes. When the filling has been in the freezer for 45 minutes, then remove the pies from the freezer (if in a tart pan, then remove from the tart pan – see notes) and drizzle the pies with the melted chocolate chips and top with some chopped peanuts. Enjoy!!!
Notes
*Make ahead peanut butter pies: We like to make the crust, freeze it for 15 minutes, then make the filling, then place the filling in the crust, cover them in plastic wrap (we tent the pies, so the plastic wrap doesn’t touch the filling), then freeze them overnight. We removed the tartlets from the freezer, individually wrapped each tartlet and kept them in the freeze until ready to eat. About an hour before serving, we remove them from the freezer and allow them to thaw for 45 to 60 minutes on the counter, then place them in the fridge until ready to serve. The best way to tell when the filling is no longer frozen is that it will go from matte to glossy. When ready to serve drizzle with the melted chocolate and chopped nuts. However, if you wish, you can drizzle them with the melted chocolate and chopped peanuts after they have been in the freezer for 45 minutes, then return them to the freezer for freezing them overnight. Make sure you tent the pies while the filling and drizzles chocolate are not frozen. Once the filling and chocolate are frozen, you can wrap them individually in plastic wrap and put them back in the freezer.
*Vegan Cream Cheese: We used Kite Hill Cream Cheese as it is Whole Food Plant Based and convenient. We also tested this recipe using our own Vegan Cream Cheese recipe (we halved our cream cheese recipe – you only need 2 Tablespoons for 2 mini pies) and the pies was equally delicious. You can use any vegan cream cheese you wish as long as it has a neutral flavor and is very thick. To test the thickness of your cream cheese for this recipe, take a teaspoon and scoop some up, then turn the teaspoon over. If the cream cheese stays on the spoon, it is thick enough. If it drips off, it’s not. Additionally, some homemade vegan cream cheese recipes have garlic/onion powder as ingredients and are not thick enough. These vegan cream cheese recipes will not work. If using a homemade vegan cream cheese, make the cream cheese at least 3 to 24 hours before making the peanut butter pie for best results.
*Tart Pan: If using mini tart pans with removable bottoms, for best results for removing the tart pan, freeze the pies overnight. Then remove the pies from the freezer, allow the pies to sit for 3 minutes on the counter to start the thawing process, then place a small juice glass or shot glass on the counter, center the tart pan over top of the glass and gently press downward on the outer sides of the tart pan. The outer rim of the tart pan should fall off. To remove the bottom tart pan disk, gently slide a very thin bladed knife between the crust and the metal disk, just enough to release the disk. It should fall off as well. Continue thawing on the counter for 45 to 60 minutes, then place in the fridge. Then top with the chocolate drizzle and chopped peanuts.
*Refrigerated Light Coconut Milk: Only use lite/light coconut milk that has been refrigerated. We tested light coconut milk that had been placed in the fridge overnight vs one that had been placed in the freezer for an hour (no longer than an hour in the freezer). Both worked well. The key is that the lite coconut milk has to be cold. Using unrefrigerated lite coconut milk did not yield as great of results. Additionally, shake the can of lite/light coconut milk really well before using. Light coconut milk is WFPB compliant, while full fat coconut milk is not.
*Vegan Chocolate Chips: We used Enjoy Life Semi-Sweet Mega Chocolate Chunks. Enjoy Life Dark Chocolate Morsels or any other chocolate of choice will work.
*Sea Salt: Please adjust the sea salt based upon your family’s sea salt preferences and/or based upon dietary needs.
*Serving: 2 Tartlets/ 2 mini ramekins
*Storage: Refrigerate, use within 5 days. Freezer friendly