Description
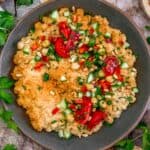
Indulge in the delightful flavors of this delicious and comforting Lebanese Musabaha recipe, a warm chickpea breakfast that is sure to satisfy and leave you feeling energized.
Ingredients
Scale
Base Ingredients:
- 2 – [ 15.5 oz. cans ] chickpeas, undrained
- 1 Tablespoon tahini
- 2 Tablespoons lemon juice
- ¼ teaspoon garlic powder
- Pinch to ¼ teaspoon sea salt (+/-) *
- Pinch to ¼ teaspoon cumin (+/-) (optional) *
Optional Topping Ingredients:
- Red bell peppers, fine dice
- Mini cucumbers, fine dice
- Tomatoes, small chunks (or seeded, fine dice)
- Toasted pine nuts
- Sprinkle paprika
Serving Ideas:
- Torn warm pita
Instructions
- If planning to serve with Optional Topping Ingredients, prepare them before beginning the recipe.
- Place the 2 cans of chickpeas (including liquids from both cans) into a medium-sized stockpot, bring to a boil, then reduce to gentle boil. Gently boil for 10 minutes. Remove from the stove.
- Then scoop out approximately 1 cup of the cooked chickpeas, set aside.
- Mash the chickpeas with a potato masher (or fork) in the pot, then add all the remaining Base Ingredients, stir well to combine, then add the 1 cup of cooked chickpeas that was set aside in Step 3, back in. Stir well to combine.
- Place the warm Musabaha mixture on a plate, then top (if desired) with the Optional Topping Ingredients (either on top or on the side) and serve with warmed pita. Tear the pita and scoop up (using the torn pita as a spoon).
Notes
*Please reference the blog post for Tips for Success, Pantry Items Used, Storage and Freezing, and Kitchen Products Used.
*Sea Salt: Please adjust the sea salt based upon your family’s sea salt preferences and/or based upon dietary needs.
*Servings: 2 to 3